R读取Greenplum database数据

###R读取Greenplum database数据


####R读取gpdb的相关包安装

1
install.packages("RPostgreSQL")

####R读取股票代码

1
2
3
4
5
6
7
8
9
10

library(RPostgreSQL)

con <- dbConnect(PostgreSQL(), host = "10.2.28.234", port = 5432, user= "fitl", password="xxxx", dbname="fitl")

rs <- dbGetQuery(con,"select windcode, code, market, cnname, enname, type from hffd.tdb_codes")

head(rs, n=10L)

dbDisconnect(con)

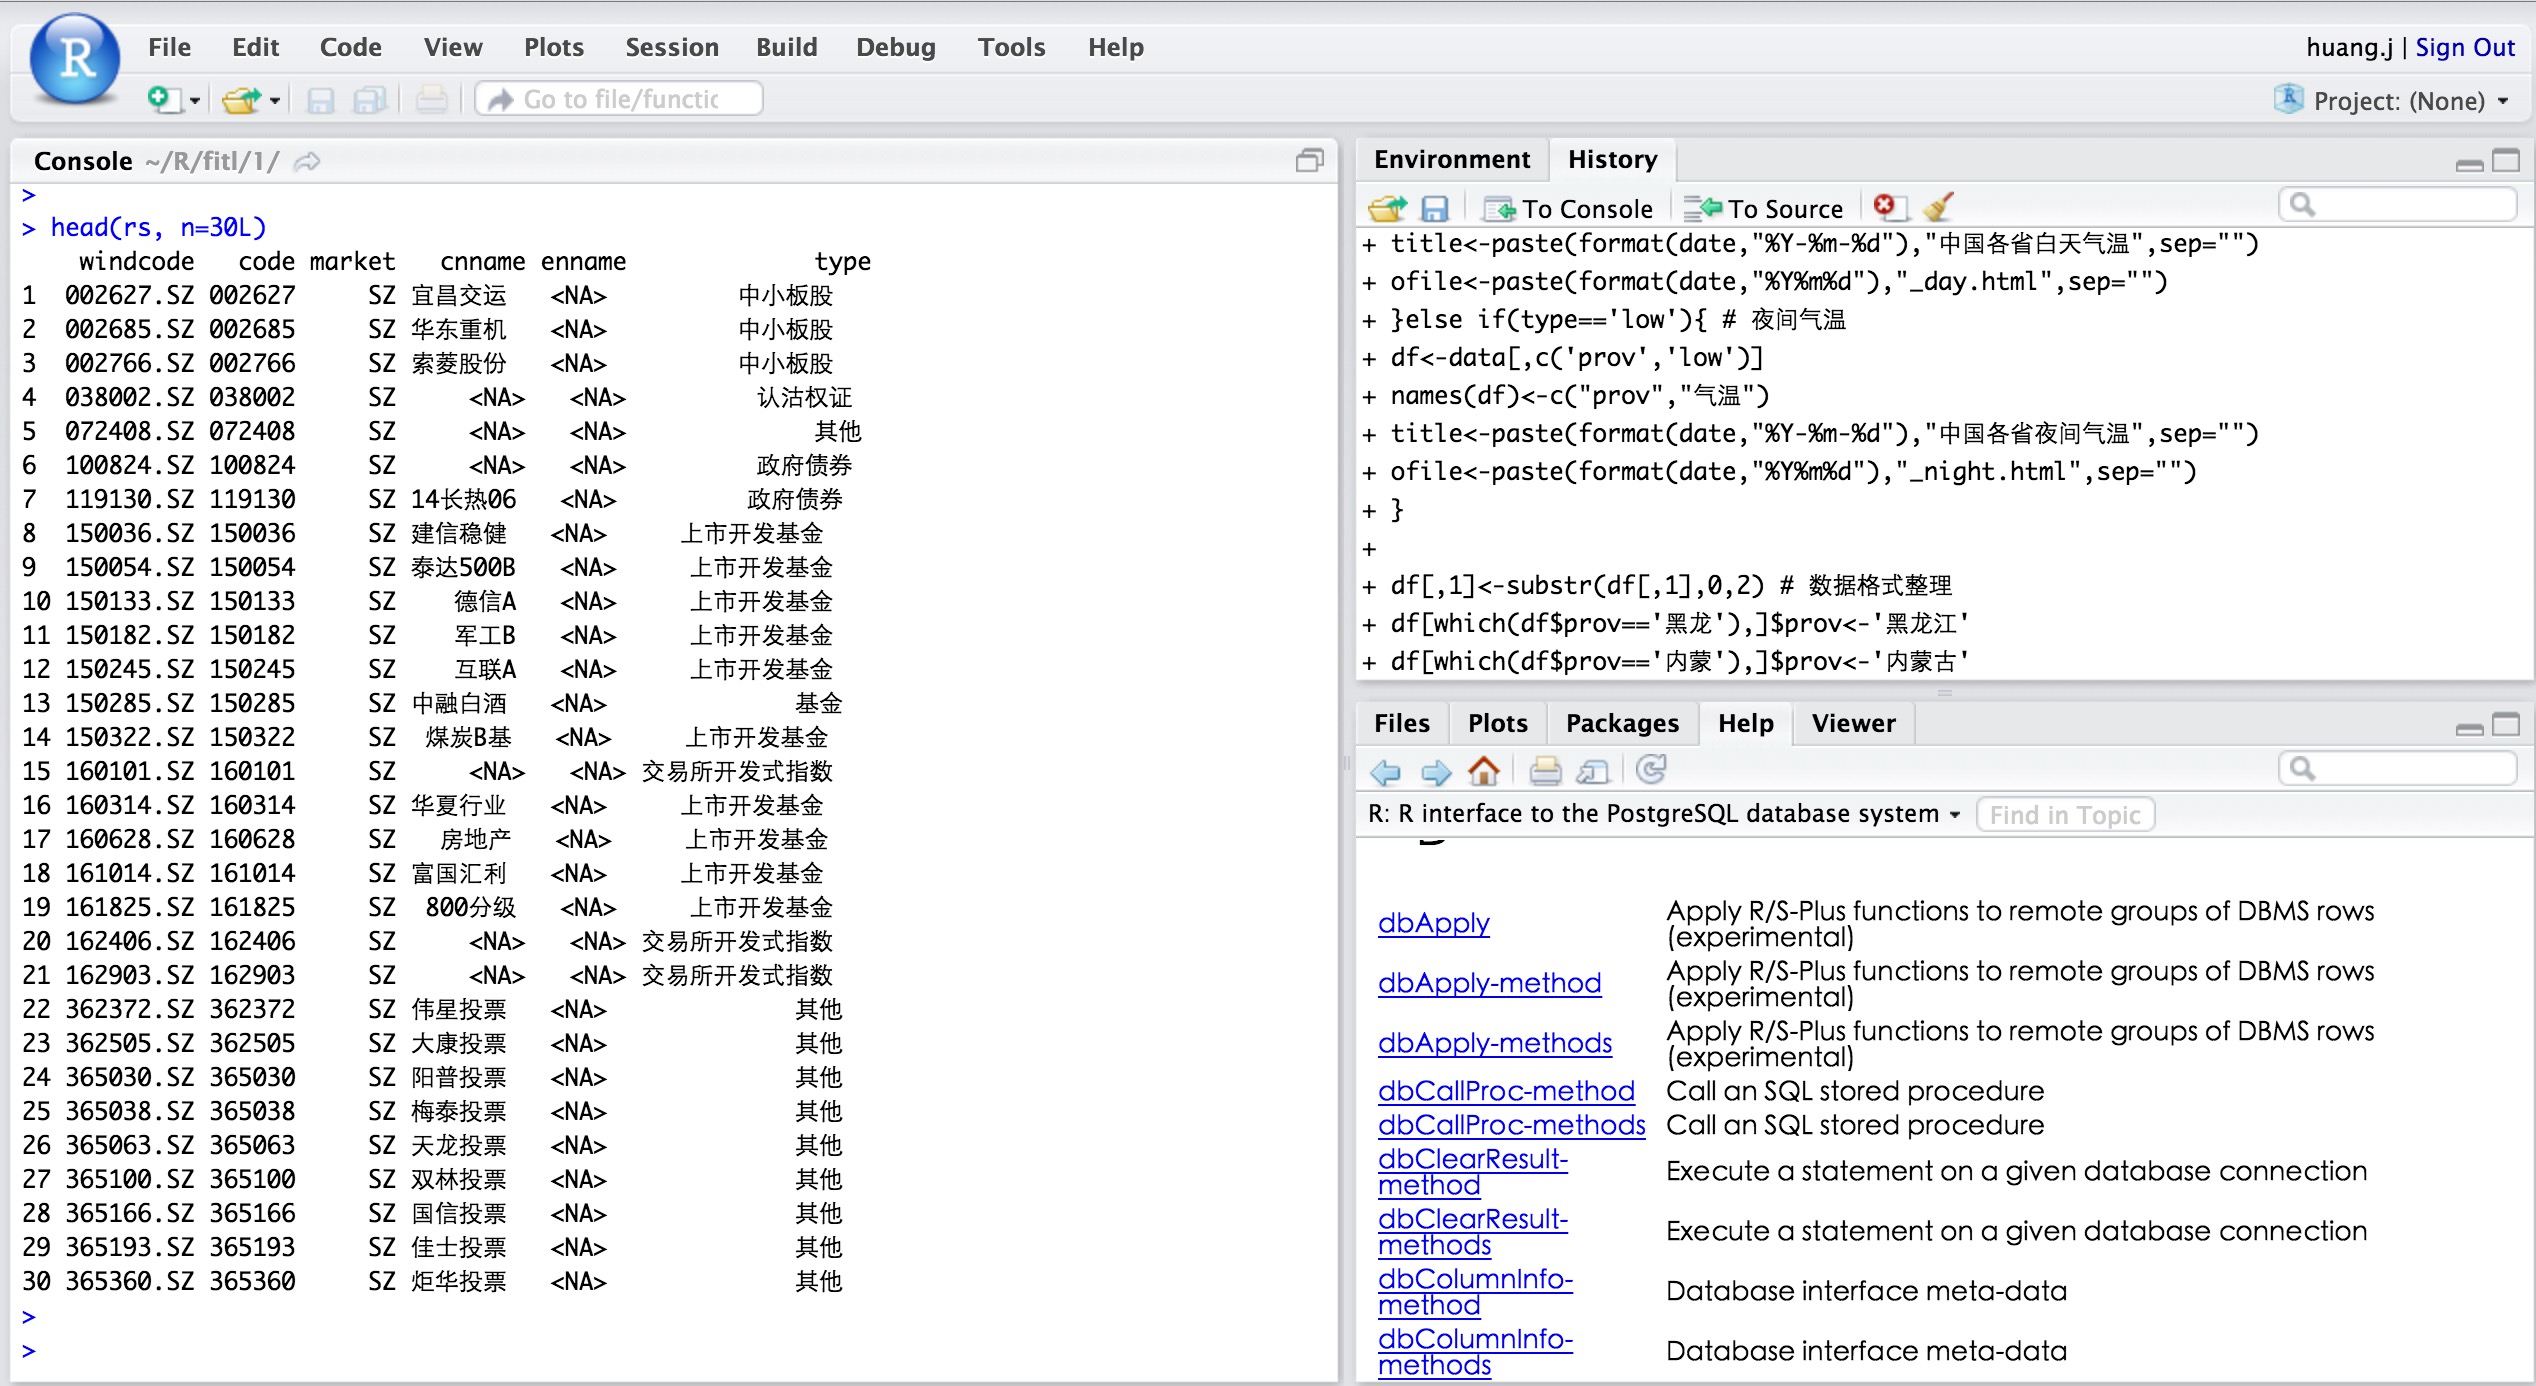
####效果如下

通过RStuido测试

R读取股票代码数据

Centos7上Docker和kubernets环境部署

###Centos7上Docker和kubernets环境部署


  • Kubernetes 是 Google 团队发起的开源项目,它的目标是管理跨多个主机的容器,提供基本的部署,维护以及运用伸缩,主要实现语言为Go语言。Kubernetes是:

易学:轻量级,简单,容易理解 便携:支持公有云,私有云,混合云,以及多种云平台 可拓展:模块化,可插拔,支持钩子,可任意组合 自修复:自动重调度,自动重启,自动复制

注意:关闭firewall和selinux

####安装etcd

  • etcd是CoreOS团队发起的一个管理配置信息和服务发现(service discovery)的项目。它的目标是构建一个高可用的分布式键值(key-value)数据库,基于 Go 语言实现。
1
yum install etcd -y

编辑

1
/etc/etcd/etcd.conf

1
2
3
4
5
6
7
# [member]
ETCD_NAME=default
ETCD_DATA_DIR="/var/lib/etcd/default.etcd"
ETCD_LISTEN_CLIENT_URLS="http://0.0.0.0:2379"

#[cluster]
ETCD_ADVERTISE_CLIENT_URLS="http://0.0.0.0:2379"

启动服务

1
2
systemctl enable etcd
systemctl start etcd

####安装kubernets master

1
yum install kubernetes-master -y

编辑

1
/etc/kubernetes/apiserver

1
2
3
4
5
6
7
8
9
10
11
12
13
14
# The address on the local server to listen to.
KUBE_API_ADDRESS="--address=0.0.0.0"

# Comma separated list of nodes in the etcd cluster
KUBE_ETCD_SERVERS="--etcd_servers=http://10.2.29.185:2379"

# Address range to use for services
KUBE_SERVICE_ADDRESSES="--service-cluster-ip-range=10.254.0.0/16"

# default admission control policies
KUBE_ADMISSION_CONTROL="--admission_control=NamespaceLifecycle,NamespaceExists,LimitRanger,SecurityContextDeny,ServiceAccount,ResourceQuota"

# Add your own!
KUBE_API_ARGS=""

编辑

1
/etc/kubernetes/controller-manager

1
2
3
4
5
6
7
8
###
# The following values are used to configure the kubernetes controller-manager

# defaults from config and apiserver should be adequate

# Add your own!
KUBE_CONTROLLER_MANAGER_ARGS="--node-monitor-grace-period=10s --pod-eviction-timeout=10s"

编辑

1
/etc/kubernetes/config

1
2
3
4
5
6
7
8
9
10
11
12
13
14
15
16
17
18
19
20
21
# kubernetes system config
#
# The following values are used to configure various aspects of all
# kubernetes services, including
#
#   kube-apiserver.service
#   kube-controller-manager.service
#   kube-scheduler.service
#   kubelet.service
#   kube-proxy.service
# logging to stderr means we get it in the systemd journal
KUBE_LOGTOSTDERR="--logtostderr=true"

# journal message level, 0 is debug
KUBE_LOG_LEVEL="--v=0"

# Should this cluster be allowed to run privileged docker containers
KUBE_ALLOW_PRIV="--allow_privileged=false"

# How the controller-manager, scheduler, and proxy find the apiserver
KUBE_MASTER="--master=http://10.2.29.185:8080"

启动服务

1
2
systemctl enable kube-apiserver kube-scheduler kube-controller-manager
systemctl start kube-apiserver kube-scheduler kube-controller-manager

####安装kubernets node

1
yum install kubernetes-node flannel docker -y

编辑

1
/etc/kubernetes/config

1
2
3
4
5
6
7
8
9
10
11
12
13
14
15
16
17
18
19
20
21
# kubernetes system config
#
# The following values are used to configure various aspects of all
# kubernetes services, including
#
#   kube-apiserver.service
#   kube-controller-manager.service
#   kube-scheduler.service
#   kubelet.service
#   kube-proxy.service
# logging to stderr means we get it in the systemd journal
KUBE_LOGTOSTDERR="--logtostderr=true"

# journal message level, 0 is debug
KUBE_LOG_LEVEL="--v=0"

# Should this cluster be allowed to run privileged docker containers
KUBE_ALLOW_PRIV="--allow_privileged=false"

# How the controller-manager, scheduler, and proxy find the apiserver
KUBE_MASTER="--master=http://10.2.29.185:8080"

编辑

1
/etc/kubernetes/kubelet

1
2
3
4
5
6
7
8
9
10
11
12
13
14
15
16
17
# kubernetes kubelet (minion) config

# The address for the info server to serve on (set to 0.0.0.0 or "" for all interfaces)
KUBELET_ADDRESS="--address=127.0.0.1"

# The port for the info server to serve on
# KUBELET_PORT="--port=10250"

# You may leave this blank to use the actual hostname
KUBELET_HOSTNAME="--hostname_override=10.2.29.185"

# location of the api-server
KUBELET_API_SERVER="--api_servers=http://10.2.29.185:8080"

# Add your own!
KUBELET_ARGS="--pod-infra-container-image=kubernetes/pause"

启动服务

1
2
systemctl enable kubelet kube-proxy
systemctl start kubelet kube-proxy

####kubernets node配置flannel

  • 初始化flannel的etcd配置
1
etcdctl -C 10.2.29.185:2379 set /coreos.com/network/config '{ "Network": "10.1.0.0/16" }'

编辑

1
/etc/sysconfig/flanneld

1
2
3
4
5
6
7
8
9
# etcd url location.  Point this to the server where etcd runs
FLANNEL_ETCD="http://10.2.29.185:2379"

# etcd config key.  This is the configuration key that flannel queries
# For address range assignment
FLANNEL_ETCD_KEY="/coreos.com/network"

# Any additional options that you want to pass
#FLANNEL_OPTIONS=""

启动服务

1
2
systemctl enable flanneld
systemctl restart flanneld docker

查看docker进程

1
2
ps -ef|grep docker
root      3287     1  3 20:22 ?        00:00:00 /usr/bin/docker daemon --selinux-enabled --bip=10.1.51.1/24 --mtu=1472

网络已通

1
2
3
4
5
6
7
8
9
10
ping 10.1.51.1
PING 10.1.51.1 (10.1.51.1) 56(84) bytes of data.
64 bytes from 10.1.51.1: icmp_seq=1 ttl=64 time=0.088 ms
64 bytes from 10.1.51.1: icmp_seq=2 ttl=64 time=0.078 ms
64 bytes from 10.1.51.1: icmp_seq=3 ttl=64 time=0.072 ms
64 bytes from 10.1.51.1: icmp_seq=4 ttl=64 time=0.092 ms
^C
--- 10.1.51.1 ping statistics ---
4 packets transmitted, 4 received, 0% packet loss, time 3000ms
rtt min/avg/max/mdev = 0.072/0.082/0.092/0.012 ms

登陆到docker中

1
2
3
4
5
6
7
8
9
10
11
12
13
14
15
16
17
18
19
20
21
22
23
24
25
26
27
28
29
30
31
32
33
34
35
36
37
38
39
40
41
42
43
44
[root@docker ~]# ssh 10.1.51.1
The authenticity of host '10.1.51.1 (10.1.51.1)' can't be established.
ECDSA key fingerprint is 27:f8:7f:92:88:43:ac:e7:be:08:45:88:70:b2:09:1d.
Are you sure you want to continue connecting (yes/no)? yes
Warning: Permanently added '10.1.51.1' (ECDSA) to the list of known hosts.
root@10.1.51.1's password:
Last login: Mon Dec 14 20:20:50 2015 from 10.2.29.162
[root@docker ~]#
[root@docker ~]#
[root@docker ~]#
[root@docker ~]# ifconfig
docker0: flags=4099<UP,BROADCAST,MULTICAST>  mtu 1500
        inet 10.1.51.1  netmask 255.255.255.0  broadcast 0.0.0.0
        ether 02:42:ae:a2:21:1a  txqueuelen 0  (Ethernet)
        RX packets 0  bytes 0 (0.0 B)
        RX errors 0  dropped 0  overruns 0  frame 0
        TX packets 0  bytes 0 (0.0 B)
        TX errors 0  dropped 0 overruns 0  carrier 0  collisions 0

ens160: flags=4163<UP,BROADCAST,RUNNING,MULTICAST>  mtu 1500
        inet 10.2.29.185  netmask 255.255.255.0  broadcast 10.2.29.255
        inet6 fe80::250:56ff:fea7:79ac  prefixlen 64  scopeid 0x20<link>
        ether 00:50:56:a7:79:ac  txqueuelen 1000  (Ethernet)
        RX packets 859  bytes 77851 (76.0 KiB)
        RX errors 0  dropped 0  overruns 0  frame 0
        TX packets 321  bytes 39175 (38.2 KiB)
        TX errors 0  dropped 0 overruns 0  carrier 0  collisions 0

flannel0: flags=81<UP,POINTOPOINT,RUNNING>  mtu 1472
        inet 10.1.51.0  netmask 255.255.0.0  destination 10.1.51.0
        unspec 00-00-00-00-00-00-00-00-00-00-00-00-00-00-00-00  txqueuelen 500  (UNSPEC)
        RX packets 0  bytes 0 (0.0 B)
        RX errors 0  dropped 0  overruns 0  frame 0
        TX packets 0  bytes 0 (0.0 B)
        TX errors 0  dropped 0 overruns 0  carrier 0  collisions 0

lo: flags=73<UP,LOOPBACK,RUNNING>  mtu 65536
        inet 127.0.0.1  netmask 255.0.0.0
        inet6 ::1  prefixlen 128  scopeid 0x10<host>
        loop  txqueuelen 0  (Local Loopback)
        RX packets 8567  bytes 1089443 (1.0 MiB)
        RX errors 0  dropped 0  overruns 0  frame 0
        TX packets 8567  bytes 1089443 (1.0 MiB)
        TX errors 0  dropped 0 overruns 0  carrier 0  collisions 0

OK,至此结束

Mac上搭建nodejs开发环境

###Mac上搭建nodejs开发环境


####安装homebrew

1
2
3
ruby -e "$(curl -fsSL https://raw.githubusercontent.com/Homebrew/install/master/install)"
brew update
brew doctor

####安装nodejs

通过brew安装nodejs和grunt

1
2
brew install node
npm install -g grunt-cli

安装成功

1
2
3
4
node -v
v4.2.1
npm -v
2.14.7

####安装express

1
2
3
4
5
6
7
sudo npm install express -g
sudo npm install -g express-generator@4
/usr/local/bin/express -> /usr/local/lib/node_modules/express-generator/bin/express
express-generator@4.13.1 /usr/local/lib/node_modules/express-generator
├── sorted-object@1.0.0
├── commander@2.7.1 (graceful-readlink@1.0.1)
└── mkdirp@0.5.1 (minimist@0.0.8)
1
2
express -V
4.13.1

安装成功

####建立express工程

1
2
3
4
5
6
7
8
9
10
11
12
13
14
15
16
17
18
19
20
21
22
23
24
25
26
27
mkdir javascript
cd javascript

express -e nodejs-demo

   create : nodejs-demo
   create : nodejs-demo/package.json
   create : nodejs-demo/app.js
   create : nodejs-demo/public
   create : nodejs-demo/public/javascripts
   create : nodejs-demo/public/images
   create : nodejs-demo/public/stylesheets
   create : nodejs-demo/public/stylesheets/style.css
   create : nodejs-demo/routes
   create : nodejs-demo/routes/index.js
   create : nodejs-demo/routes/users.js
   create : nodejs-demo/views
   create : nodejs-demo/views/index.ejs
   create : nodejs-demo/views/error.ejs
   create : nodejs-demo/bin
   create : nodejs-demo/bin/www

   install dependencies:
     $ cd nodejs-demo && npm install

   run the app:
     $ DEBUG=nodejs-demo:* npm start

为项目安装依赖包

1
2
3
4
5
6
7
8
9
10
11
12
13
14
15
16
17
18
19
20
21
22
23
24
25
26
27
28
29
30
31
32
33
34
35
36
37
38
39
40
41
42
43
44
45
46
47
48
49
50
51
52
53
54
55
56
57
58
cd nodejs-demo && npm install
ejs@2.3.4 node_modules/ejs

debug@2.2.0 node_modules/debug
└── ms@0.7.1

cookie-parser@1.3.5 node_modules/cookie-parser
├── cookie@0.1.3
└── cookie-signature@1.0.6

serve-favicon@2.3.0 node_modules/serve-favicon
├── fresh@0.3.0
├── etag@1.7.0
├── ms@0.7.1
└── parseurl@1.3.0

morgan@1.6.1 node_modules/morgan
├── on-headers@1.0.1
├── basic-auth@1.0.3
├── depd@1.0.1
└── on-finished@2.3.0 (ee-first@1.1.1)

express@4.13.3 node_modules/express
├── escape-html@1.0.2
├── merge-descriptors@1.0.0
├── cookie@0.1.3
├── array-flatten@1.1.1
├── utils-merge@1.0.0
├── cookie-signature@1.0.6
├── methods@1.1.1
├── content-type@1.0.1
├── range-parser@1.0.3
├── fresh@0.3.0
├── etag@1.7.0
├── serve-static@1.10.0
├── vary@1.0.1
├── path-to-regexp@0.1.7
├── content-disposition@0.5.0
├── parseurl@1.3.0
├── depd@1.0.1
├── qs@4.0.0
├── on-finished@2.3.0 (ee-first@1.1.1)
├── finalhandler@0.4.0 (unpipe@1.0.0)
├── proxy-addr@1.0.9 (forwarded@0.1.0, ipaddr.js@1.0.4)
├── send@0.13.0 (destroy@1.0.3, statuses@1.2.1, ms@0.7.1, mime@1.3.4, http-errors@1.3.1)
├── type-is@1.6.10 (media-typer@0.3.0, mime-types@2.1.8)
└── accepts@1.2.13 (negotiator@0.5.3, mime-types@2.1.8)

body-parser@1.13.3 node_modules/body-parser
├── content-type@1.0.1
├── bytes@2.1.0
├── depd@1.0.1
├── qs@4.0.0
├── on-finished@2.3.0 (ee-first@1.1.1)
├── iconv-lite@0.4.11
├── http-errors@1.3.1 (statuses@1.2.1, inherits@2.0.1)
├── type-is@1.6.10 (media-typer@0.3.0, mime-types@2.1.8)
└── raw-body@2.1.5 (unpipe@1.0.0, bytes@2.2.0, iconv-lite@0.4.13)

启动应用

1
2
3
4
5
6
7
8
npm start

> nodejs-demo@0.0.0 start /Users/huangjie/javascript/nodejs-demo
> node ./bin/www
GET / 200 15.102 ms - 207
GET /stylesheets/style.css 200 3.974 ms - 111
GET /favicon.ico 404 3.388 ms - 1076
GET / 200 1.632 ms - 207

测试是否启动成功

1
2
3
4
5
6
7
8
9
10
11
curl http://localhost:3000
<!DOCTYPE html>
<html>
  <head>
    <title>Express</title>
    <link rel='stylesheet' href='/stylesheets/style.css' />
  </head>
  <body>
    <h1>Express</h1>
    <p>Welcome to Express</p>
  </body>

ok,至此,nodejs的express框架环境已经配置成功,接下来就可以享受nodejs开发的快感了….

Express4框架使用

###Express4框架使用


####什么是express

官方解释如下:

  • Web应用:Express是一个简洁、灵活的Node.js Web应用开发框架, 它提供一系列健壮的特性,帮助你创建各种Web和移动设备应用。
  • API:丰富的HTTP快捷方法随你信手拈来,让你创建健壮的API变得既快速又简单。
  • 性能:Express不对Node已有的特性进行二次抽象,我们只是在它之上扩展了Web应用所需的基本功能。
  • LoopBack:基于Express框架开发模型驱动的应用。请到loopback.io了解更多信息。

####从hello world入手

使用python将matlab文件转换成csv文件

###使用python将matlab文件转换成csv文件


####说明 因为项目需要,需要将matlab的文件读取出来,并转换成csv各式

####环境 python2.6.6 centos6.4

####调用了python模块

1
2
3
import scipy.io
import pandas as pd
import numpy as np

scipy用来加载mat文件 numpy用来解析mat文件的结构体,转成多维数据结构 pandas将多维数据转换成dataframe后保存为csv文件

####读取matlab结构体文件

拿期货数据举例

1
2
3
4
5
6
7
8
9
10
11
12
13
14
15
16
17
import scipy.io
import pandas as pd
import numpy as np
code = scipy.io.loadmat('/fitl/TDB_FURTURE/futurecode/matlab.mat')
>>> code.keys()
['code', '__version__', '__header__', '__globals__']
>>> code = code.get('code')
>>> type(code)
<type 'numpy.ndarray'>
>>> code.ndim
2
>>> code.shape
(1, 1)
>>> code.dtype
dtype([('WindCode', 'O'), ('Code', 'O'), ('Market', 'O'), ('CNName', 'O'), ('ENName', 'O'), ('Type', 'O')])
>>> code.size
1

说明:scipy加载的mat文件后是字典类型,然后获取下标为‘code’的字典的值,为numpy.ndarray多维数据结构;

####解析多维数组的数据

1
2
3
4
5
6
7
8
9
10
11
12
13
14
15
16
17
18
19
20
21
22
23
24
>>> code[0][0][0][:]
array([u'399001.SZ', u'399002.SZ', u'399003.SZ', ..., u'TT1512.CF',
       u'TT1512-S.CF', u'y.CF'],
      dtype='<U48')
>>> code[0][0][1][:]
array([u'399001', u'399002', u'399003', ..., u'TT1512', u'TT1512-S', u'y'],
      dtype='<U48')
>>> code[0][0][2][:]
array([u'SZ', u'SZ', u'SZ', ..., u'CF', u'CF', u'CF'],
      dtype='<U48')
>>> code[0][0][3][:]
array([u'\u6df1\u8bc1\u6210\u6307', u'\u6df1\u6210\u6307R',
       u'\u6210\u4efd\uff22\u6307', ..., u'TT1512(\u4eff\u771f)',
       u'TT1512(\u4eff\u771f)', u''],
      dtype='<U48')
>>> code[0][0][4][:]
array([u'', u'', u'', ..., u'', u'', u''],
      dtype='<U48')
>>> code[0][0][5][:]
array([u'\u4ea4\u6613\u6240\u6307\u6570',
       u'\u4ea4\u6613\u6240\u6307\u6570',
       u'\u4ea4\u6613\u6240\u6307\u6570', ..., u'\u6307\u6570\u671f\u8d27',
       u'\u672a\u77e5', u'\u672a\u77e5'],
      dtype='<U48')

说明:获取多维数组的各个维度数据,均采用unicode编码

####讲多维数组转换成数据框

1
2
3
4
5
6
7
8
9
10
11
12
13
14
15
16
17
18
19
20
21
22
23
24
25
26
27
28
29
30
31
32
33
34
35
36
37
38
39
40
41
42
43
44
45
46
47
48
49
50
51
52
53
54
55
56
57
58
59
60
61
62
63
64
65
66
67
68
69
70
71
72
73
74
75
76
77
78
79
80
81
82
83
84
85
86
87
88
89
90
91
92
93
94
95
96
97
98
99
100
101
102
103
104
105
106
107
108
109
110
111
112
113
114
115
116
117
118
119
120
121
122
123
124
125
126
127
128
129
130
131
132
133
134
135
136
137
138
139
140
141
>>> windcode = pd.DataFrame.from_records(code[0][0][0][:])
>>> new_code = code[0][0][0][:].reshape(code[0][0][0][:].size,1)
>>> new_code
array([[u'399001.SZ'],
       [u'399002.SZ'],
       [u'399003.SZ'],
       ...,
       [u'TT1512.CF'],
       [u'TT1512-S.CF'],
       [u'y.CF']],
      dtype='<U48')
>>> windcode = pd.DataFrame.from_records(new_code,columns=['windcode'])
>>> windcode
          windcode
0        399001.SZ
1        399002.SZ
2        399003.SZ
3        399004.SZ
4        399005.SZ
5        399100.SZ
6        399101.SZ
7        399106.SZ
8        399107.SZ
9        399108.SZ
10       399110.SZ
11       399120.SZ
12       399130.SZ
13       399131.SZ
14       399132.SZ
15       399133.SZ
16       399134.SZ
17       399135.SZ
18       399136.SZ
19       399137.SZ
20       399138.SZ
21       399139.SZ
22       399140.SZ
23       399150.SZ
24       399160.SZ
25       399170.SZ
26       399180.SZ
27       399190.SZ
28       399200.SZ
29       399210.SZ
...            ...
22296     T1412.CF
22297     T1503.CF
22298     T1506.CF
22299     T1509.CF
22300     T1512.CF
22301     T1603.CF
22302     T1606.CF
22303    TF1312.CF
22304    TF1403.CF
22305    TF1406.CF
22306    TF1409.CF
22307    TF1412.CF
22308    TF1503.CF
22309    TF1506.CF
22310    TF1509.CF
22311    TF1512.CF
22312    TF1603.CF
22313    TF1606.CF
22314      TFC1.CF
22315      TFC2.CF
22316      TFC3.CF
22317    TT1412.CF
22318    TT1503.CF
22319    TT1506.CF
22320  TT1506-S.CF
22321    TT1509.CF
22322  TT1509-S.CF
22323    TT1512.CF
22324  TT1512-S.CF
22325         y.CF

>>> windcode.join(dcode)
          windcode      code
0        399001.SZ    399001
1        399002.SZ    399002
2        399003.SZ    399003
3        399004.SZ    399004
4        399005.SZ    399005
5        399100.SZ    399100
6        399101.SZ    399101
7        399106.SZ    399106
8        399107.SZ    399107
9        399108.SZ    399108
10       399110.SZ    399110
11       399120.SZ    399120
12       399130.SZ    399130
13       399131.SZ    399131
14       399132.SZ    399132
15       399133.SZ    399133
16       399134.SZ    399134
17       399135.SZ    399135
18       399136.SZ    399136
19       399137.SZ    399137
20       399138.SZ    399138
21       399139.SZ    399139
22       399140.SZ    399140
23       399150.SZ    399150
24       399160.SZ    399160
25       399170.SZ    399170
26       399180.SZ    399180
27       399190.SZ    399190
28       399200.SZ    399200
29       399210.SZ    399210
...            ...       ...
22296     T1412.CF     T1412
22297     T1503.CF     T1503
22298     T1506.CF     T1506
22299     T1509.CF     T1509
22300     T1512.CF     T1512
22301     T1603.CF     T1603
22302     T1606.CF     T1606
22303    TF1312.CF    TF1312
22304    TF1403.CF    TF1403
22305    TF1406.CF    TF1406
22306    TF1409.CF    TF1409
22307    TF1412.CF    TF1412
22308    TF1503.CF    TF1503
22309    TF1506.CF    TF1506
22310    TF1509.CF    TF1509
22311    TF1512.CF    TF1512
22312    TF1603.CF    TF1603
22313    TF1606.CF    TF1606
22314      TFC1.CF      TFC1
22315      TFC2.CF      TFC2
22316      TFC3.CF      TFC3
22317    TT1412.CF    TT1412
22318    TT1503.CF    TT1503
22319    TT1506.CF    TT1506
22320  TT1506-S.CF  TT1506-S
22321    TT1509.CF    TT1509
22322  TT1509-S.CF  TT1509-S
22323    TT1512.CF    TT1512
22324  TT1512-S.CF  TT1512-S
22325         y.CF         y

[22326 rows x 2 columns]

说明:使用强大的pandas将多维数组转成dataframe; 将多个dataframe连接成一个大的dataframe

####dataframe保存为csv

1
2
3
4
5
6
7
8
9
10
11
12
13
14
15
16
17
18
19
>>> windcode.join(dcode).to_csv('/opt/wind_code.csv',encoding='utf-8',index=False)
[root@client opt]# more wind_code.csv
windcode,code
399001.SZ,399001
399002.SZ,399002
399003.SZ,399003
399004.SZ,399004
399005.SZ,399005
399100.SZ,399100
399101.SZ,399101
399106.SZ,399106
399107.SZ,399107
399108.SZ,399108
399110.SZ,399110
399120.SZ,399120
399130.SZ,399130
399131.SZ,399131
399132.SZ,399132
399133.SZ,399133

备注:numpy和pandas这两个库还是非常的强大,处理数据的速度也是很优秀

####一个完整的python程序

功能:读取2015年的股指期货行情数据,mat文件的结构体,并将结构体内的数据抽取出来,转换成dataframe,然后保存为csv文件。一共1亿6千多万条数据。

1
2
3
4
5
6
7
8
9
10
11
12
13
14
15
16
17
18
19
20
21
22
23
24
25
26
27
28
29
30
31
32
33
34
35
36
37
38
39
40
41
42
43
44
45
46
47
48
49
50
51
52
53
54
55
56
57
58
59
60
61
62
63
64
65
66
67
68
69
70
71
72
73
74
75
76
77
78
79
80
81
82
83
84
85
86
#!/usr/bin/python
#coding:utf-8
import scipy.io as sio
import csv
import os
import os.path
import traceback
import time
import numpy as np
import pandas as pd

rootdir = "/fitl/TDB_FURTURE/futureab/2015_Month/"
csvdir = "/fitl/TDB_FURTURE/futureab/2015_csv/"
for parent,dirnames,filenames in os.walk(rootdir):
    for filename in filenames:
        if os.path.splitext(filename)[1] == '.mat':
            f_name = os.path.join(parent,filename)
            f_name_1 = f_name.split("/")
            f_name_2 = f_name_1[len(f_name_1)-1]
            file_name = f_name.replace('.mat','')
            csv_f = csvdir+f_name_2 + '.csv'
            isexist = os.path.exists(csvdir+file_name + '.csv')
            #f_year = int(file_name[0:4])#string.atoi(file_name[0:4])
            #f_month = int(file_name[4:6]) #string.atoi()
            #f_day = int(file_name[6:8])
            print('convert mat file is :')
            print(f_name)
            print(file_name)
	    print(csv_f)
            if not isexist:
                try:
                    print('read mat file..........\n')
                    #读取mat结构体文件
                    data = sio.loadmat(f_name)
		    data = data.get('futureab')
                    #解析第一个变量
		    print('dataframe..........\n')
		    WindCode = pd.DataFrame.from_records(data[0][0][0][:].reshape(data[0][0][0][:].size,1),columns=['WindCode'])
                    Code = pd.DataFrame.from_records(data[0][0][1][:].reshape(data[0][0][1][:].size,1),columns=['Code'])
                    Date = pd.DataFrame.from_records(data[0][0][2][:].reshape(data[0][0][2][:].size,1),columns=['Date'])
                    Time = pd.DataFrame.from_records(data[0][0][3][:].reshape(data[0][0][3][:].size,1),columns=['Time'])
                    Volume = pd.DataFrame.from_records(data[0][0][4][:].reshape(data[0][0][4][:].size,1),columns=['Volume'])
                    Turover = pd.DataFrame.from_records(data[0][0][5][:].reshape(data[0][0][5][:].size,1),columns=['Turover'])
                    Settle = pd.DataFrame.from_records(data[0][0][6][:].reshape(data[0][0][6][:].size,1),columns=['Settle'])
                    Position = pd.DataFrame.from_records(data[0][0][7][:].reshape(data[0][0][7][:].size,1),columns=['Position'])
                    CurDelta = pd.DataFrame.from_records(data[0][0][8][:].reshape(data[0][0][8][:].size,1),columns=['CurDelta'])
                    TradeFlag = pd.DataFrame.from_records(data[0][0][9][:].reshape(data[0][0][9][:].size,1),columns=['TradeFlag'])
                    AccVolume = pd.DataFrame.from_records(data[0][0][10][:].reshape(data[0][0][10][:].size,1),columns=['AccVolume'])
                    AccTurover = pd.DataFrame.from_records(data[0][0][11][:].reshape(data[0][0][11][:].size,1),columns=['AccTurover'])
                    Open = pd.DataFrame.from_records(data[0][0][12][:].reshape(data[0][0][12][:].size,1),columns=['Open'])
                    High = pd.DataFrame.from_records(data[0][0][13][:].reshape(data[0][0][13][:].size,1),columns=['High'])
                    Low = pd.DataFrame.from_records(data[0][0][14][:].reshape(data[0][0][14][:].size,1),columns=['Low'])
                    Price = pd.DataFrame.from_records(data[0][0][15][:].reshape(data[0][0][15][:].size,1),columns=['Price'])
                    AskPrice = pd.DataFrame.from_records(data[0][0][16][:].reshape(data[0][0][16][:].size,1),columns=['AskPrice'])
                    AskVolume = pd.DataFrame.from_records(data[0][0][17][:].reshape(data[0][0][17][:].size,1),columns=['AskVolume'])
                    BidPrice = pd.DataFrame.from_records(data[0][0][18][:].reshape(data[0][0][18][:].size,1),columns=['BidPrice'])
                    BidVolume = pd.DataFrame.from_records(data[0][0][19][:].reshape(data[0][0][19][:].size,1),columns=['BidVolume'])
                    PreClose = pd.DataFrame.from_records(data[0][0][20][:].reshape(data[0][0][20][:].size,1),columns=['PreClose'])
                    PreSettle = pd.DataFrame.from_records(data[0][0][21][:].reshape(data[0][0][21][:].size,1),columns=['PreSettle'])
                    PrePosition = pd.DataFrame.from_records(data[0][0][22][:].reshape(data[0][0][22][:].size,1),columns=['PrePosition'])
                    #join矩阵
		    print('save to csv file..........\n')
                    WindCode.join(Code).join(Date).join(Time).join(Volume).join(Turover).join(Settle).join(Position).join(CurDelta).join(TradeFlag).join(AccVolume).join(AccTurover)\
                    .join(Open).join(High).join(Low).join(Price).join(AskPrice).join(AskVolume).join(BidPrice).join(BidVolume).join(PreClose).join(PreSettle).join(PrePosition)\
                    .to_csv(csv_f,encoding='utf-8',index=False)
                    print('successful write mat file into csv file!\n')
                        
                    f_success = open('/opt/hj/w_success.csv','a')
                    w_success = csv.writer(f_success)
                    w_time = time.strftime('%Y-%m-%d %X',time.localtime(time.time()))
                    w_success.writerow([filename,'success',w_time])
                    f_success.close()
                    
                except:
                    print(file_name)
                    error_file_log = open('/opt/hj/error_mat_file.csv','a')
                    w_error_file = csv.writer(error_file_log)
                    w_error_file.writerow([filename])
                    error_file_log.flush()
                    error_file_log.close()
                    #print(filename)
                    error_log = open("/opt/hj/python_mat_error.txt",'a')
                    traceback.print_exc(file = error_log)
                    error_log.flush()
                    error_log.close()
                    continue