Networker配置部署客户端

###Networker配置部署客户端 安装文件存放在

1
ddbackup
服务器的
1
/emcsoftware
下面

###1. 安装linux客户端

1
yum install lgtoclnt-8.1.1.8-1.x86_64.rpm  -y

###2. 修改hosts文件 修改

1
/etc/hosts
,添加以下内容

1
2
10.2.28.236     DD2500.xxb.cn   DD2500
10.2.28.238     ddbackup.xxb.cn ddbackup

###3. 在networker管理台配置客户端

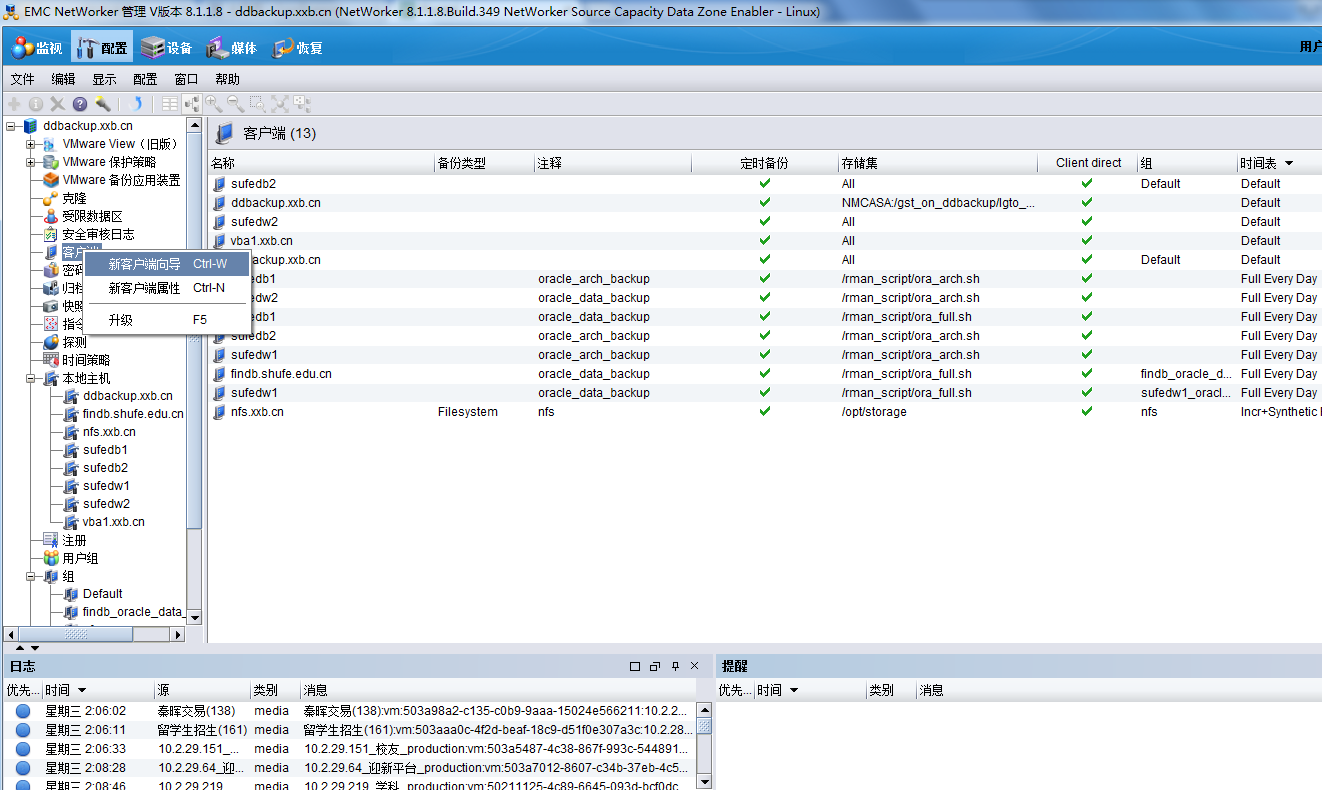
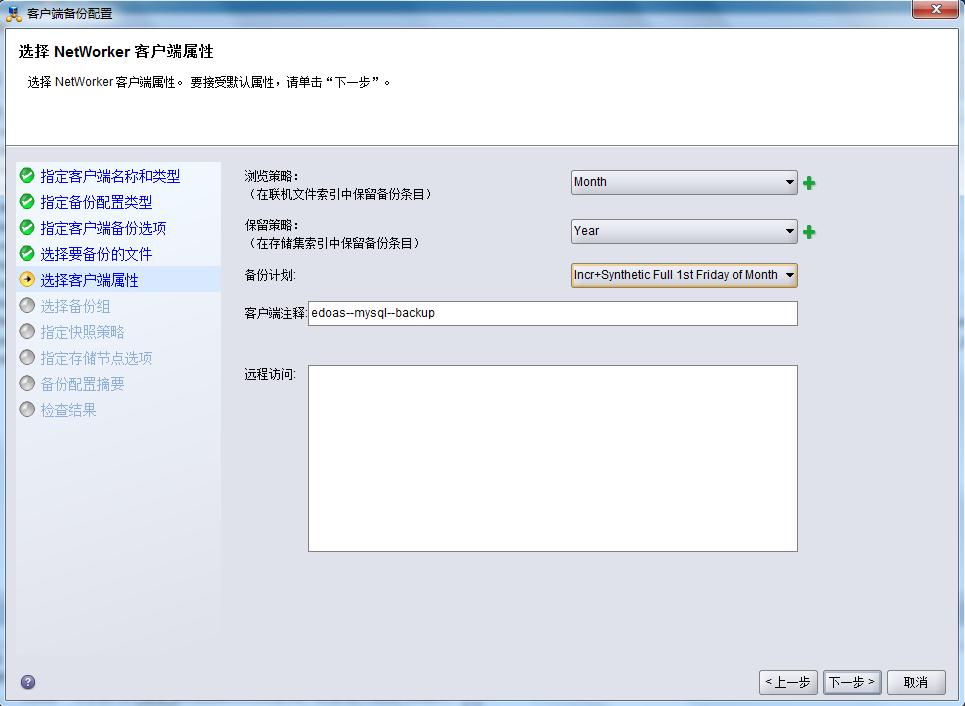
  • 新增客户端向导 新增客户端向导
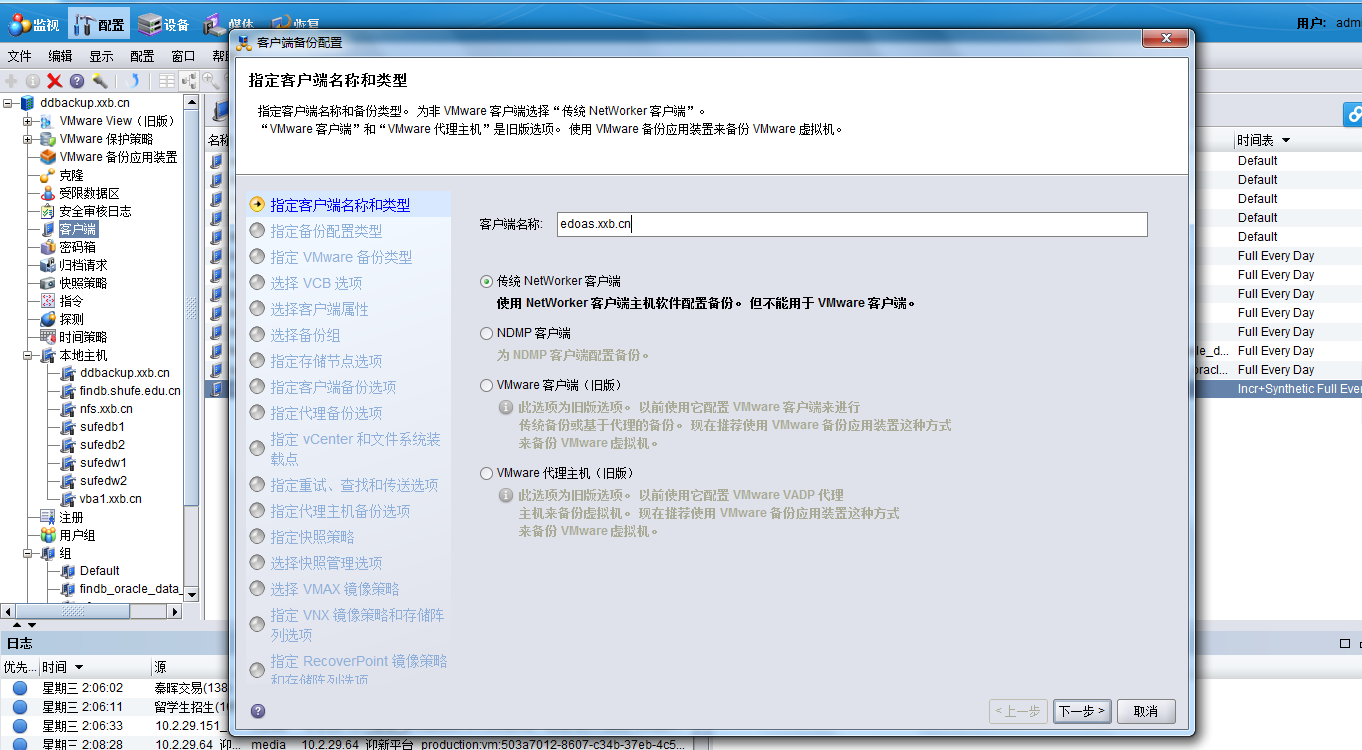
  • 指定客户端名称 指定客户端名称
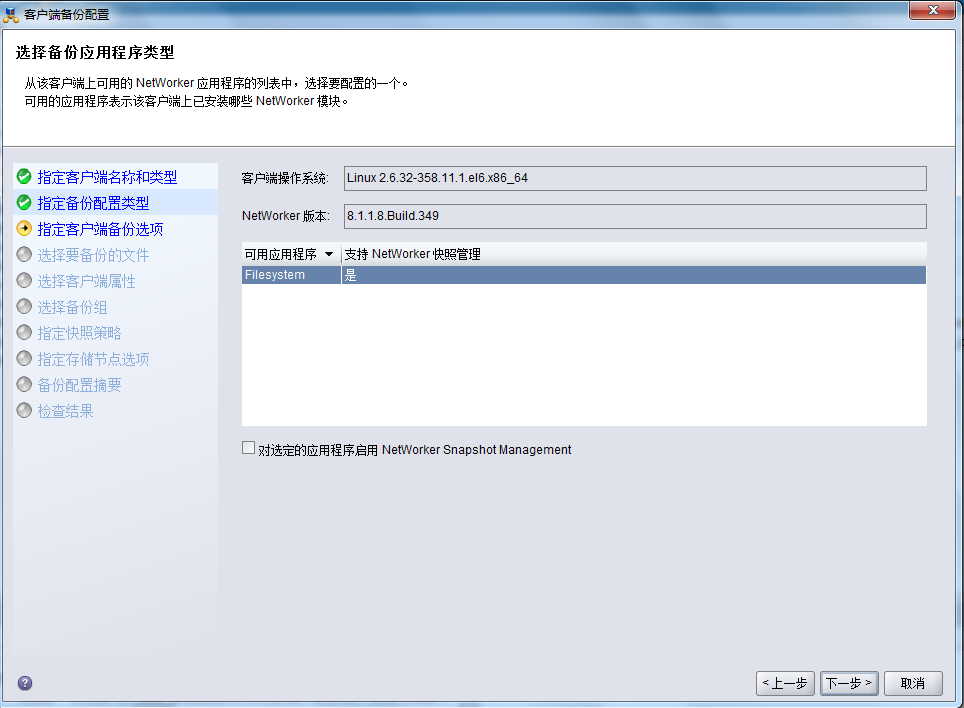
  • 选择文件系统备份 选择文件系统备份
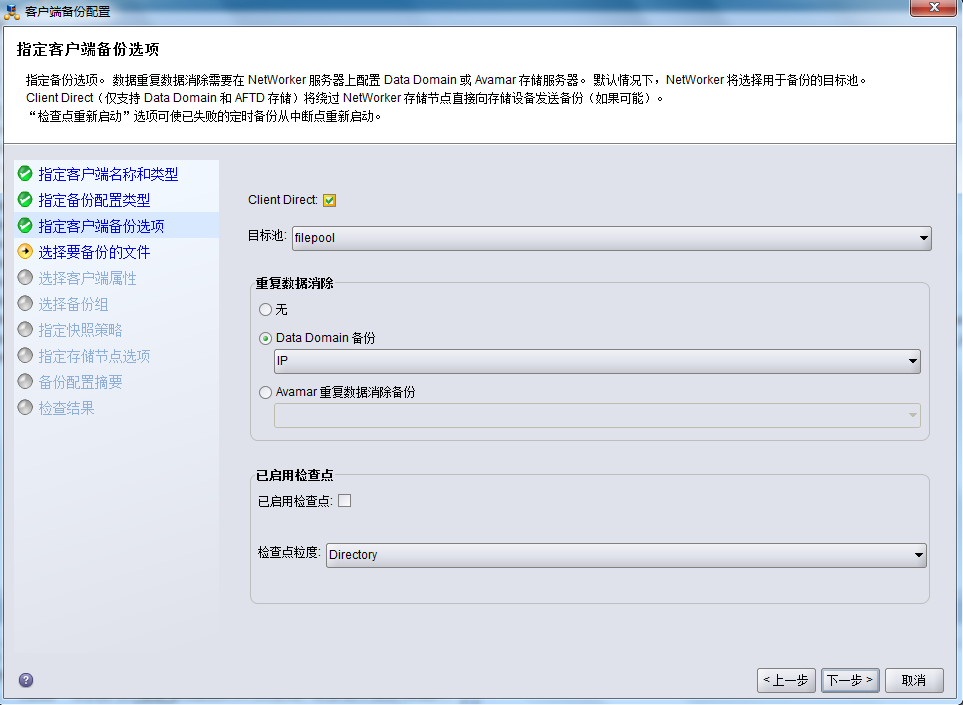
  • 选择备份目标池 选择备份目标池
  • 设置备份策略和备份计划 设置备份策略和备份计划
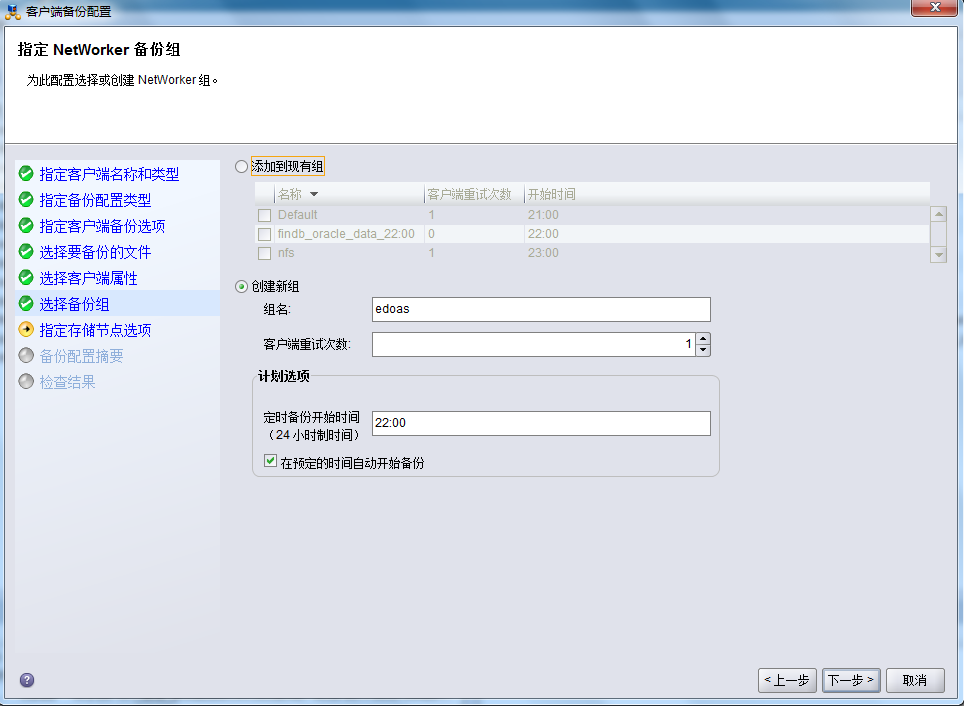
  • 设置备份组 设置备份组
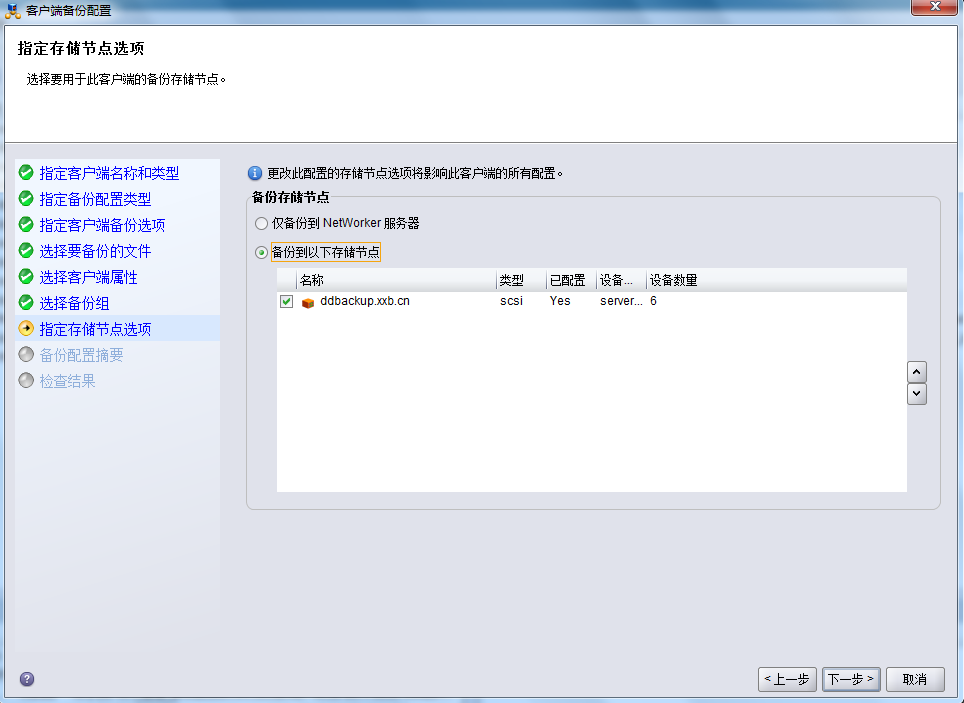
  • 设置备份目标 设置备份目标
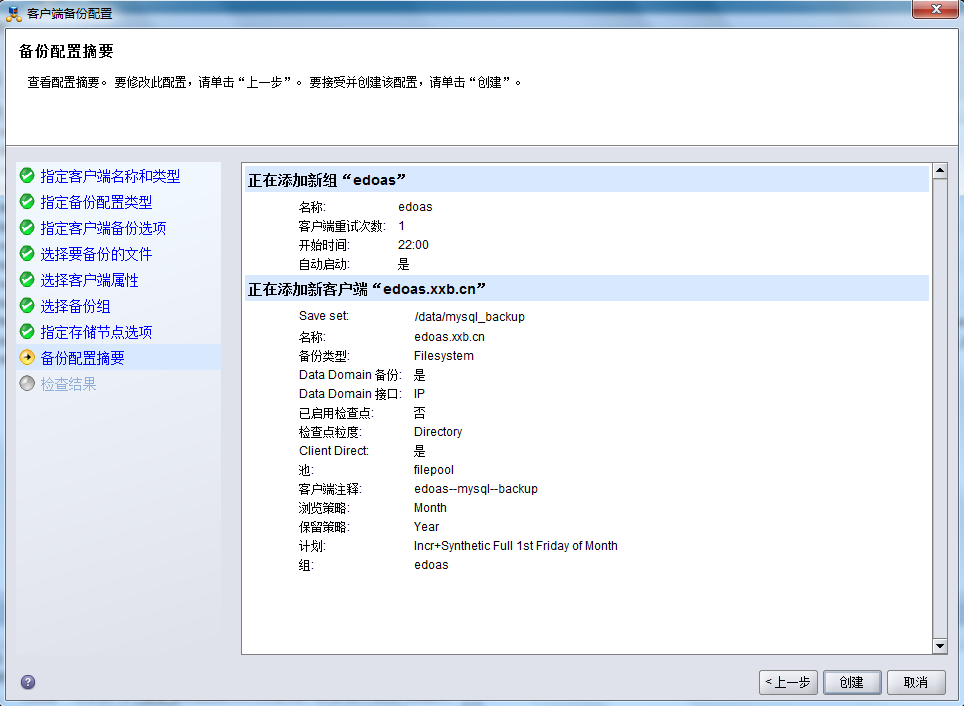
  • 完成配置 完成配置

###4. networker客户端无法连接处理

  • networker相关服务重启
1
2
3
4
/etc/init.d/gst stop
/etc/init.d/gst start
service networker stop
service networker start
  • vba相关服务重启
1
2
emwebapp.sh --stop
emwebapp.sh --start
DataDomain清理过期备份释放空间

###DataDomain清理过期备份释放空间

使用Networker和DataDomain的备份方案,经常会遇到DD空间已满,无法备份的问题,手动删除以前没用的备份数据集,释放空间

####1. 登录DD查看备份占用情况

1
2
3
4
5
6
7
8
[root@ddbackup ~]# mminfo -m
 状态  卷                       已写入  (%)   到期       读取  装载      容量
       filepool.001              30 TB 100% 2016年06月25日 0 KB   9      0 KB
       index.001                886 GB 100% 2016年09月26日 0 KB  10      0 KB
       oraclepool.001            63 TB 100% 2016年06月19日 0 KB   9      0 KB
       sqlpool.001                0 KB   0%     undef    0 KB     9      0 KB
       VBA Volume 1               0 KB   0%     undef    0 KB     9      0 KB
       vmpool.001               374 TB 100% 2016年08月17日 10 TB 10      0 KB

####2. 查出oracle数据库1个月前的备份集

1
2
3
4
5
6
7
8
9
10
11
12
13
14
15
16
17
18
19
20
21
22
23
24
25
26
27
28
29
30
31
32
33
34
35
36
37
38
39
40
41
42
43
44
45
46
47
48
49
50
51
52
53
54
55
56
57
58
59
60
61
62
63
64
65
66
67
68
69
70
71
72
73
74
75
76
77
78
79
80
81
82
83
84
85
86
87
88
89
[root@ddbackup ~]# mminfo -avot -q "volume=oraclepool.001 , savetime < 1 months ago" -r ssid
2212281426
2195504223
2178727018
2161949806
2145172597
2111618176
2094840965
1289613467
1272836251
1172174771
870186198
853409006
836631790
819854577
803077397
786300188
769522975
719195354
702418138
685640926
668863710
652086727
635309512
618532318
601755104
584977895
568200682
534646279
517869067
31405446
14628306
4292818661
4276041521
4259264613
4242487410
4225710529
4208933378
4192156408
4175379497
4158602330
4141825114
4125048226
4108271029
4091494180
4074716992
4057940114
4041162925
4024386075
4007608859
3990831644
3974054599
3957277395
3940500184
3890170092
3873392949
3856615734
3839838521
3823061306
3806284382
3789507166
3772729952
3755952736
3739175767
3722398551
3705621412
3688844203
3672066990
3655289786
3621735361
3604958147
3554626988
3537849785
3521072569
3504295357
3487518156
3470740948
3453963735
3386859100
3403636316
3370081893
3353304677
3336527698
3319750485
3302973277
3286196066
3269418859
3235864439
3219087227

备份集太多了,一个一个手动删除太麻烦,把备份集信息保存到文件中

1
mminfo -avot -q "volume=oraclepool.001 , savetime < 1 months ago" -r ssid > /tmp/ssid_need_to_delete.log 2>&1

####3. 使用脚本批量删除

1
for x in `cat /tmp/ssid_need_to_delete.log`; do nsrmm -d -y -S $x; echo $x; done

####4. 删除VBA的备份集

1
mminfo -avot -q "client=vba1,  savetime < 2 months ago" -r ssid > /tmp/ssid_need_to_delete.log 2>&1

找出后同样使用nsrmm释放空间

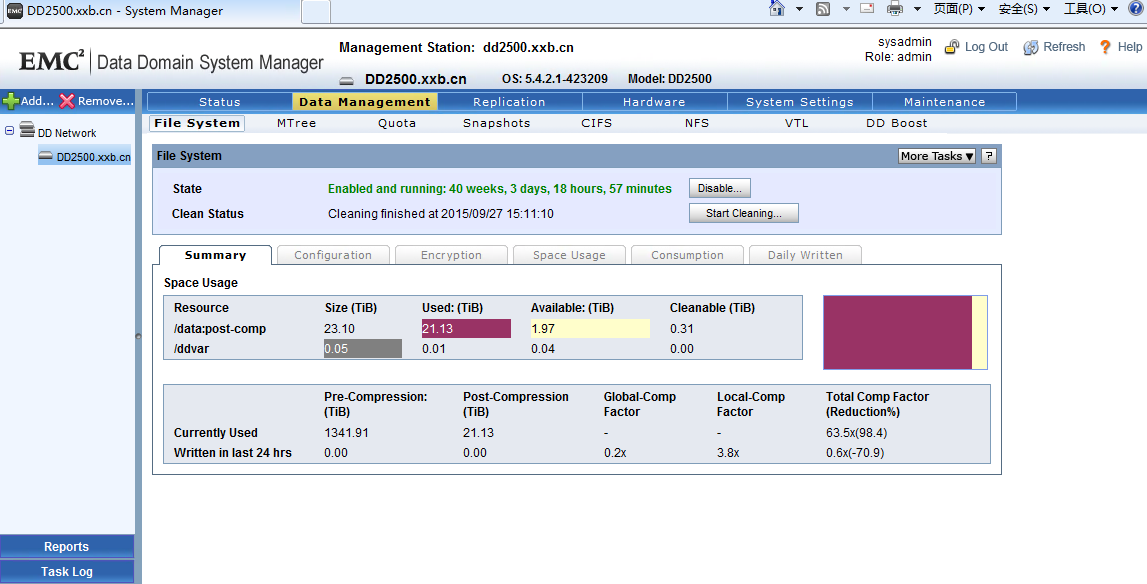
####5. DD的空间默认是每周固定时间做Clean操作 只有当Clean操作完成之后,才会正真释放DD的存储空间,所以如果DD空间不够了,还需手动执行Clean操作释放空间

Clean释放空间

SpringXD流处理举例

###SpringXD流处理举例

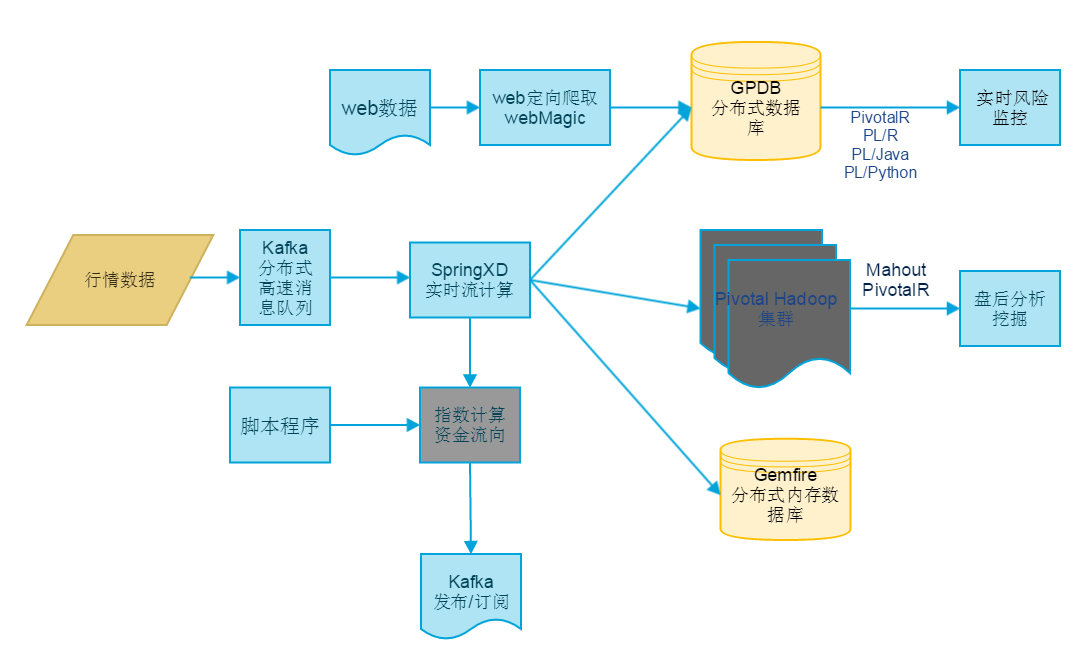
金融高频数据处理流图

####1. 金融高频数据 首先在GPDB中创建一个表,用来接受金融高频数据,这里用行情数据price举例

1
2
3
4
5
6
7
8
9
10
11
12
13
14
15
16
17
18
19
20
21
22
23
24
25
26
27
28
29
30
31
32
33
34
35
36
37
38
39
40
41
42
43
44
45
46
47
48
49
50
51
52
53
54
55
56
57
58
59
60
61
62
63
64
65
66
67
68
69
70
71
72
73
74
75
76
77
78
79
80
81
82
83
84
85
86
87
88
89
90
91
92
93
94
95
96
97
98
99
100
create table price(
id bigint,
bondid_type integer,
bondid integer,
bondcode varchar,
price_status char,
product_status char,
trade_date varchar,
trade_time varchar,
trade_time2 integer,
trade_time_int integer,
preclose float,
open float,
high float,
low float,
current float,
volume integer,
turnover float,
trade_num float,
total_BidVol float,
total_AskVol float,
Weighted_Avg_BidPrice float,
Weighted_Avg_AskPrice float,
IOPV float,
Yield_To_Maturity float,
High_Limited float,
Low_Limited float,
pe1 float,
pe2 float,
delta float,
Ask_Price1 float,
ask_volume1 float,
ask_order1 integer,
Ask_Price2 float,
ask_volume2 float,
ask_order2 integer,
Ask_Price3 float,
ask_volume3 float,
ask_order3 integer,
Ask_Price4 float,
ask_volume4 float,
ask_order4 integer,
Ask_Price5 float,
ask_volume5 float,
ask_order5 integer,
Ask_Price6 float,
ask_volume6 float,
ask_order6 integer,
Ask_Price7 float,
ask_volume7 float,
ask_order7 integer,
Ask_Price8 float,
ask_volume8 float,
ask_order8 integer,
Ask_Price9 float,
ask_volume9 float,
ask_order9 integer,
Ask_Price10 float,
ask_volume10 float,
ask_order10 integer,
bid_Price1 float,
bid_volume1 float,
bid_order1 integer,
bid_Price2 float,
bid_volume2 float,
bid_order2 integer,
bid_Price3 float,
bid_volume3 float,
bid_order3 integer,
bid_Price4 float,
bid_volume4 float,
bid_order4 integer,
bid_Price5 float,
bid_volume5 float,
bid_order5 integer,
bid_Price6 float,
bid_volume6 float,
bid_order6 integer,
bid_Price7 float,
bid_volume7 float,
bid_order7 integer,
bid_Price8 float,
bid_volume8 float,
bid_order8 integer,
bid_Price9 float,
bid_volume9 float,
bid_order9 integer,
bid_Price10 float,
bid_volume10 float,
bid_order10 integer,
Pre_Open_interest integer,
Pre_Settle_Price integer,
open_interest integer,
Settle_Price integer,
Pre_Delta integer,
Curr_Delta integer,
Prefix varchar
)
WITH (appendonly=true,orientation=column,compresstype=QUICKLZ,COMPRESSLEVEL=1)  
distributed  by  (trade_date)  ;

####2. 在springxd集群中创建一个stream流kafka2gp 这个stream的作用就是从kafka中取对应的topic数据,经过springxd处理,流向gpdb

1
stream create --name kafka2gp --definition "kafka --zkconnect=10.2.29.4:2181 --topic=price --autoOffsetReset=smallest --outputType=text/plain  |  jdbc --inputType=application/json --columns=id,bondid_type,bondid,bondcode,price_status,product_status,trade_date,trade_time,trade_time2,trade_time_int,preclose,open,high,low,current,volume,turnover,trade_num,total_BidVol,total_AskVol,Weighted_Avg_BidPrice,Weighted_Avg_AskPrice,IOPV,Yield_To_Maturity,High_Limited,Low_Limited,pe1,pe2,delta,Ask_Price1,ask_volume1,ask_order1,Ask_Price2,ask_volume2,ask_order2,Ask_Price3,ask_volume3,ask_order3,Ask_Price4,ask_volume4,ask_order4,Ask_Price5,ask_volume5,ask_order5,Ask_Price6,ask_volume6,ask_order6,Ask_Price7,ask_volume7,ask_order7,Ask_Price8,ask_volume8,ask_order8,Ask_Price9,ask_volume9,ask_order9,Ask_Price10,ask_volume10,ask_order10,bid_Price1,bid_volume1,bid_order1,bid_Price2,bid_volume2,bid_order2,bid_Price3,bid_volume3,bid_order3,bid_Price4,bid_volume4,bid_order4,bid_Price5,bid_volume5,bid_order5,bid_Price6,bid_volume6,bid_order6,bid_Price7,bid_volume7,bid_order7,bid_Price8,bid_volume8,bid_order8,bid_Price9,bid_volume9,bid_order9,bid_Price10,bid_volume10,bid_order10,Pre_Open_Interest,Pre_Settle_Price,Open_Interest,Settle_Price,Pre_Delta,Curr_Delta,Prefix --driverClassName=org.postgresql.Driver --tableName=price --url=jdbc:postgresql://10.2.28.234:5432/fitl --username=gpadmin --password=xxx" --deploy

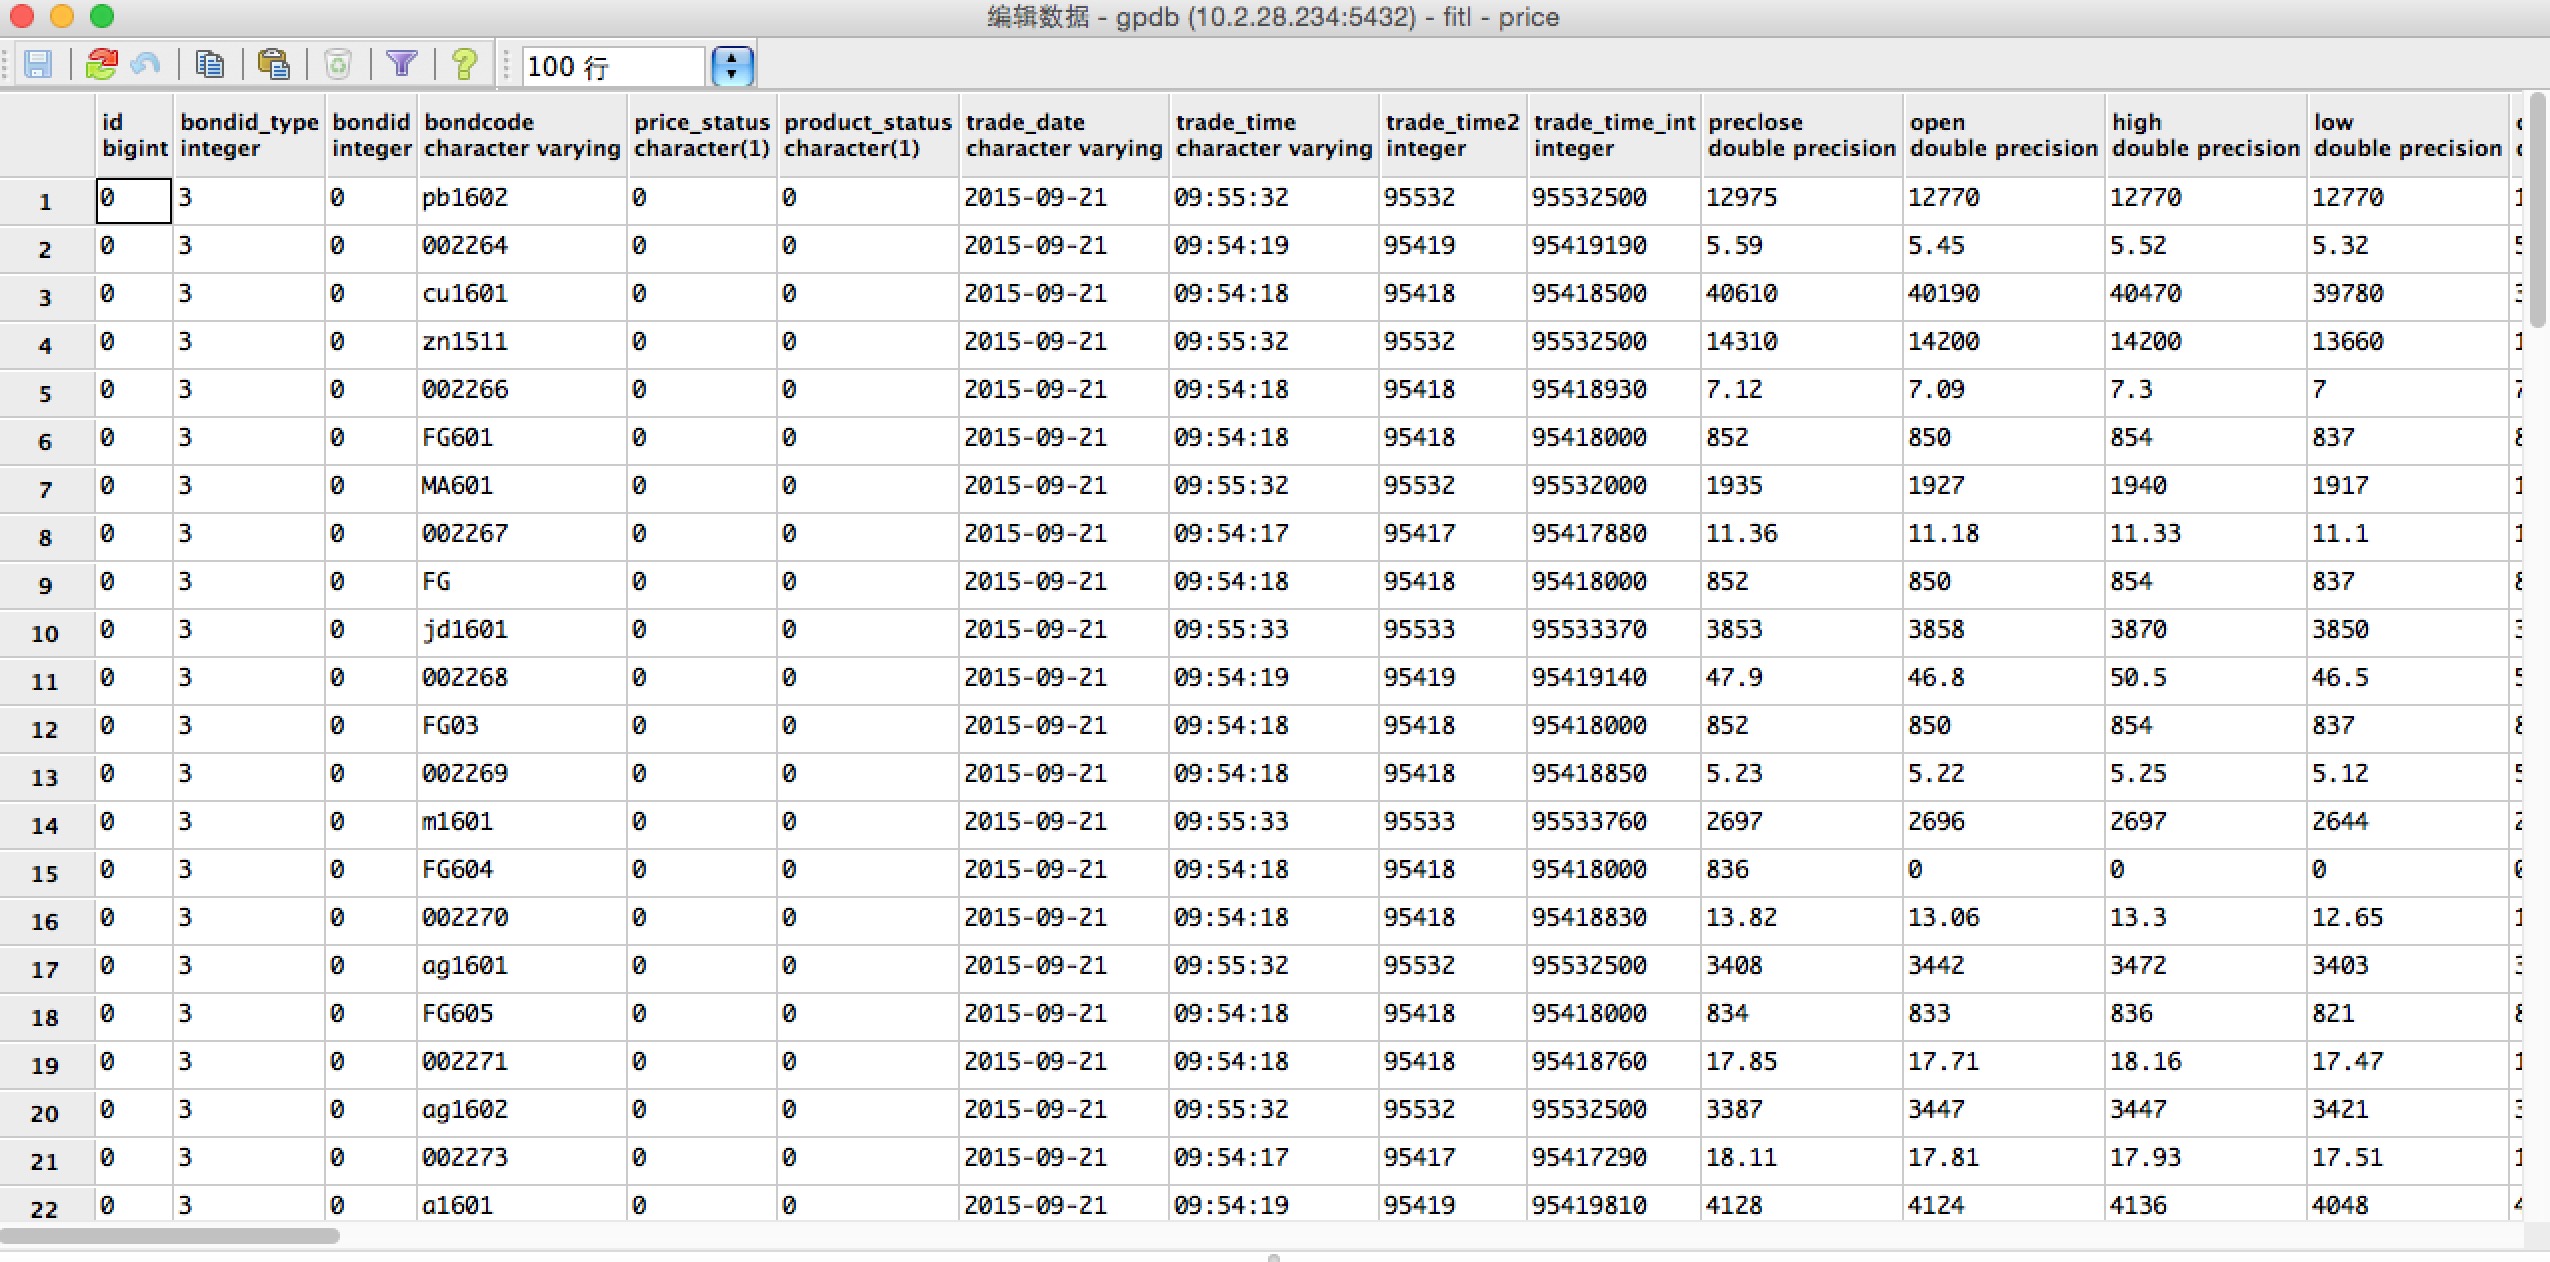
####3. 验证数据是否进入到gpdb的price表 通过pgadmin工具,查看数据表price

price表的数据

####4. 注意 springxd安装后,没有gpdb的jar包,需要将postgresql-9.4-1201-jdbc41.jar包放到

1
/opt/pivotal/spring-xd/xd/lib
位置下,重启springxd-container即可 同样如果在springxd的job中使用gpdb,也需要将包放到
1
/opt/pivotal/spring-xd/xd/modules/job
下对应的job模块的lib目录

####5. 其他流

kafka到文件

1
stream create --name kakfa2fs --definition "kafka --zkconnect=10.2.29.4:2181 --topic=price --outputType=text/plain | file --inputType=text/plain --dir=/opt/test --name=price" --deploy

kafka tap分流到hdfs

1
stream create --name kakfa2fs --definition "tap:stream:kafka2fs > hdfs --directory=/xd/fitl/ --fileName=price"  --deploy

http接收数据到hdfs

1
2
stream create --name http2hdfs --definition "http --port=9000 | hdfs --fsUri=hdfs://phd3-m1.xxb.cn:8020 --directory=/xd/fitl --fileName=httphdfs"
http post --target http://localhost:9000 --data "huangjie 3"

####6. 使用job将csv文件导入mysql数据库

将csv文件导入mysql数据库,可以直接使用filejdbc这个job来完成 首先将mysql-connector-java-5.1.34.jar的包放到

1
/opt/pivotal/spring-xd/xd/modules/job/filejdbc/lib
这个路径下

1
2
3
4
5
xd:>job create csvmysql --definition "filejdbc --driverClassName=com.mysql.jdbc.Driver --url=jdbc:mysql://gfxd1.xxb.cn:3306/springxd --username=springxd --password=springxd --resources=file:///opt/people.csv --names=forename,surname,address --tableName=people" --deploy 
Successfully created and deployed job 'csvmysql' 
--调用job
xd:>job launch csvmysql 
Successfully submitted launch request for job 'csvmysql' 
1
2
3
[root@springxd1 opt]# more people.csv 
jian,gong,beijing 
chun,lu,guangzhou 
1
2
3
4
5
6
7
8
9
10
11
12
13
14
15
16
17
18
19
20
21
22
23
24
25
26
27
28
[root@springxd1 opt]# mysql -uspringxd -h gfxd1.xxb.cn -p 
Enter password: 
Welcome to the MySQL monitor.  Commands end with ; or \g. 
Your MySQL connection id is 761 
Server version: 5.1.73 Source distribution 

Copyright (c) 2000, 2013, Oracle and/or its affiliates. All rights reserved. 

Oracle is a registered trademark of Oracle Corporation and/or its 
affiliates. Other names may be trademarks of their respective 
owners. 

Type 'help;' or '\h' for help. Type '\c' to clear the current input statement. 

mysql> use springxd 
Reading table information for completion of table and column names 
You can turn off this feature to get a quicker startup with -A 

Database changed 
mysql> select * from people; 
+----------+---------+-----------+ 
| forename | surname | address   | 
+----------+---------+-----------+ 
| jie      | huang   | shanghai  | 
| jian     | gong    | beijing   | 
| chun     | lu      | guangzhou | 
+----------+---------+-----------+ 
3 rows in set (0.00 sec) 

####7. 使用filejdbc将csv文件导入GPDB 首先将postgresql-8.1-407.jdbc3.jar的包放到

1
/opt/pivotal/spring-xd/xd/modules/job/filejdbc/lib
这个路径下

1
job create hjgpdb --definition "filejdbc --driverClassName=org.postgresql.Driver --url=jdbc:postgresql://10.2.28.234:5432/fitl --username=gpadmin --password=gpadmin --resources=file:///opt/people.csv --names=forename,surname,address --tableName=people" --deploy 
1
2
3
4
5
6
7
8
9
10
11
12
13
14
fitl=# create table people (forename varchar(20),   surname   varchar(20), address varchar(20));
NOTICE:  Table doesn't have 'DISTRIBUTED BY' clause -- Using column named 'forename' as the Greenplum Database data distribution key for this table.
HINT:  The 'DISTRIBUTED BY' clause determines the distribution of data. Make sure column(s) chosen are the optimal data distribution key to minimize skew.
CREATE TABLE
Time: 26.762 ms
fitl=# select * from people;
 forename | surname | address
----------+---------+---------
(0 rows)

Time: 7.581 ms

xd:>job create hjgpdb --definition "filejdbc --driverClassName=org.postgresql.Driver --url=jdbc:postgresql://10.2.28.234:5432/fitl --username=gpadmin --password=xxxx --resources=file:///opt/people.csv --names=forename,surname,address --tableName=people" --deploy 
Successfully created and deployed job 'hjgpdb'
GPDB segment失效问题处理

###GPDB Segment失效问题处理

####1. 现象 重新加载配置时,报错

1
2
3
4
5
6
7
8
9
10
11
12
13
[gpadmin@mdw gpseg-1]$ gpstop -u
20150923:13:53:57:004760 gpstop:mdw:gpadmin-[INFO]:-Starting gpstop with args: -u
20150923:13:53:57:004760 gpstop:mdw:gpadmin-[INFO]:-Gathering information and validating the environment...
20150923:13:53:57:004760 gpstop:mdw:gpadmin-[INFO]:-Obtaining Greenplum Master catalog information
20150923:13:53:57:004760 gpstop:mdw:gpadmin-[INFO]:-Obtaining Segment details from master...
20150923:13:53:59:004760 gpstop:mdw:gpadmin-[INFO]:-Greenplum Version: 'postgres (Greenplum Database) 4.3.3.0 build 1'
20150923:13:53:59:004760 gpstop:mdw:gpadmin-[INFO]:-Signalling all postmaster processes to reload
.
20150923:13:54:01:004760 gpstop:mdw:gpadmin-[CRITICAL]:-Error occurred: Error Executing Command:
 Command was: 'ssh -o 'StrictHostKeyChecking no' sdw1 ". /usr/local/greenplum-db/./greenplum_path.sh; $GPHOME/bin/pg_ctl reload -D /data1/primary/gpseg1"'
rc=1, stdout='', stderr='pg_ctl: PID file "/data1/primary/gpseg1/postmaster.pid" does not exist
Is server running?
'

从日志可以看出segment1有问题,没有起来

####2. 重启整个GP数据库,问题依旧

####3. 怀疑是segment故障,恢复segment

1
gprecoverseg

等几分钟后,segmentrecover完成

####5. 需重启DB

1
2
gpstop -M immediate
gpstart

####6. 查看系统状态,恢复正常

1
2
3
4
5
6
7
8
9
10
11
[gpadmin@mdw ~]$ gpstate -e
20150923:16:10:56:008479 gpstate:mdw:gpadmin-[INFO]:-Starting gpstate with args: -e
20150923:16:10:56:008479 gpstate:mdw:gpadmin-[INFO]:-local Greenplum Version: 'postgres (Greenplum Database) 4.3.3.0 build 1'
20150923:16:10:56:008479 gpstate:mdw:gpadmin-[INFO]:-master Greenplum Version: 'PostgreSQL 8.2.15 (Greenplum Database 4.3.3.0 build 1) on x86_64-unknown-linux-gnu, compiled by GCC gcc (GCC) 4.4.2 compiled on Sep 23 2014 15:44:20'
20150923:16:10:56:008479 gpstate:mdw:gpadmin-[INFO]:-Obtaining Segment details from master...
20150923:16:10:57:008479 gpstate:mdw:gpadmin-[INFO]:-Gathering data from segments...
...
20150923:16:11:00:008479 gpstate:mdw:gpadmin-[INFO]:-----------------------------------------------------
20150923:16:11:00:008479 gpstate:mdw:gpadmin-[INFO]:-Segment Mirroring Status Report
20150923:16:11:00:008479 gpstate:mdw:gpadmin-[INFO]:-----------------------------------------------------
20150923:16:11:00:008479 gpstate:mdw:gpadmin-[INFO]:-All segments are running normally

####7. 查询某个节点是否有坏盘

1
2
3
4
5
6
7
8
9
10
11
12
13
14
[root@sdw2 ~]# omreport storage pdisk controller=0 -fmt tbl | awk -F"|" '{print $1"|"$2"|"$3"|"$4"|"$5"|"$9"|"$15"|"$18"|"$19}' |egrep -v '\-\-\-\-|\|\|'
ID    | Status  | Power Status  | Name                | State  | Secured       | Used RAID Disk Space             | Vendor ID| Product ID
0:0:0 | Ok      | Spun Up       | Physical Disk 0:0:0 | Online | Not Applicable| 1,862.50 GB (1999844147200 bytes)| DELL     | WDC WD2003FYYS-18W0B0
0:0:1 | Ok      | Spun Up       | Physical Disk 0:0:1 | Online | Not Applicable| 1,862.50 GB (1999844147200 bytes)| DELL     | WDC WD2003FYYS-18W0B0
0:0:2 | Ok      | Spun Up       | Physical Disk 0:0:2 | Online | Not Applicable| 1,862.50 GB (1999844147200 bytes)| DELL     | WDC WD2003FYYS-18W0B0
0:0:3 | Ok      | Spun Up       | Physical Disk 0:0:3 | Online | Not Applicable| 1,862.50 GB (1999844147200 bytes)| DELL     | WDC WD2003FYYS-18W0B0
0:0:4 | Ok      | Spun Up       | Physical Disk 0:0:4 | Online | Not Applicable| 1,862.50 GB (1999844147200 bytes)| DELL     | WDC WD2003FYYS-18W0B0
0:0:5 | Ok      | Spun Up       | Physical Disk 0:0:5 | Online | Not Applicable| 1,862.50 GB (1999844147200 bytes)| DELL     | WDC WD2003FYYS-18W0B0
0:0:6 | Ok      | Spun Up       | Physical Disk 0:0:6 | Online | Not Applicable| 1,862.50 GB (1999844147200 bytes)| DELL     | WDC WD2003FYYS-18W0B0
0:0:7 | Ok      | Spun Up       | Physical Disk 0:0:7 | Online | Not Applicable| 1,862.50 GB (1999844147200 bytes)| DELL     | WDC WD2003FYYS-18W0B0
0:0:8 | Critical| Not Applicable| Physical Disk 0:0:8 | Removed| Not Applicable| 1,862.50 GB (1999844147200 bytes)| DELL     | WDC WD2003FYYS-18W0B0
0:0:9 | Ok      | Spun Up       | Physical Disk 0:0:9 | Online | Not Applicable| 1,862.50 GB (1999844147200 bytes)| DELL     | WDC WD2003FYYS-18W0B0
0:0:10| Ok      | Spun Up       | Physical Disk 0:0:10| Online | Not Applicable| 1,862.50 GB (1999844147200 bytes)| DELL     | WDC WD2003FYYS-18W0B0
0:0:11| Ok      | Spun Up       | Physical Disk 0:0:11| Online | Not Applicable| 1,862.50 GB (1999844147200 bytes)| DELL     | WDC WD2003FYYS-18W0B0

可以看到节点2的第八块盘故障

SpringXD集群的分布式安装和部署

###SpringXD集群的分布式安装和部署

####1. 安装springxd 首先需要jdk7,下载rpm安装包

1
2
wget https://repo.spring.io/libs-release-local/org/springframework/xd/spring-xd/1.2.0.RELEASE/spring-xd-1.2.0.RELEASE-1.noarch.rpm
rpm -ivh spring-xd-1.2.0.RELEASE-1.noarch.rpm

####2. 安装mysql-server,并创建database

1
2
3
4
5
6
yum install mysql-server -y

mysql> create database springxd;
Query OK, 1 row affected (0.00 sec)
mysql> grant all privileges on springxd.* to springxd@'%' identified by 'springxd';
Query OK, 0 rows affected (0.01 sec)

####3. 安装redis数据库

1
2
3
yum install redis
service redis start
chkconfig redis on

修改

1
/etc/redis.conf
中的bind 0.0.0.0,重启redis服务

####4. 配置hadoop版本 修改

1
/etc/sysconfig/spring-xd
的hadoop版本

1
2
3
# The Hadoop distribution to be used for HDFS access
# [hadoop26 | phd21 | phd30 | cdh5 | hdp22]
HADOOP_DISTRO=phd30

####5. 配置springxd 修改

1
/opt/pivotal/spring-xd/xd/config/servers.yml
配置文件里的内容 添加mysql配置,redis配置,hadoop配置,zookeeper配置以及JMX配置 mysql配置:

1
2
3
4
5
6
spring:
  datasource:
    url: jdbc:mysql://gfxd1.xxb.cn:3306/springxd_new
    username: springxd_new
    password: springxd_new
    driverClassName: com.mysql.jdbc.Driver

redis配置:

1
2
3
4
spring:
  redis:
   port: 6379
   host: phd3-m1.xxb.cn

hadoop配置:

1
2
3
4
spring:
  hadoop:
    fsUri: hdfs://phd3-m1.xxb.cn:8020
    resourceManagerHost: phd3-m1.xxb.cn

zookeeper配置:

1
2
3
4
5
6
7
8
zk:
  namespace: xd
  client:
     connect: 10.2.29.4:2181,10.2.29.5:2181,10.2.29.6:2181
     sessionTimeout: 60000
     connectionTimeout: 30000
     initialRetryWait: 1000
     retryMaxAttempts: 3

JMX配置:

1
2
3
4
5
6
7
8
# Config to enable/disable JMX/jolokia endpoints
XD_JMX_ENABLED: true
endpoints:
  jolokia:
    enabled: ${XD_JMX_ENABLED:true}
  jmx:
    enabled: ${XD_JMX_ENABLED:true}
    uniqueNames: true

####6. 在集群中一个节点启动spring-xd-admin

1
service spring-xd-admin start

####7. 在集群的所有节点启动spring-xd-container

1
service spring-xd-container start

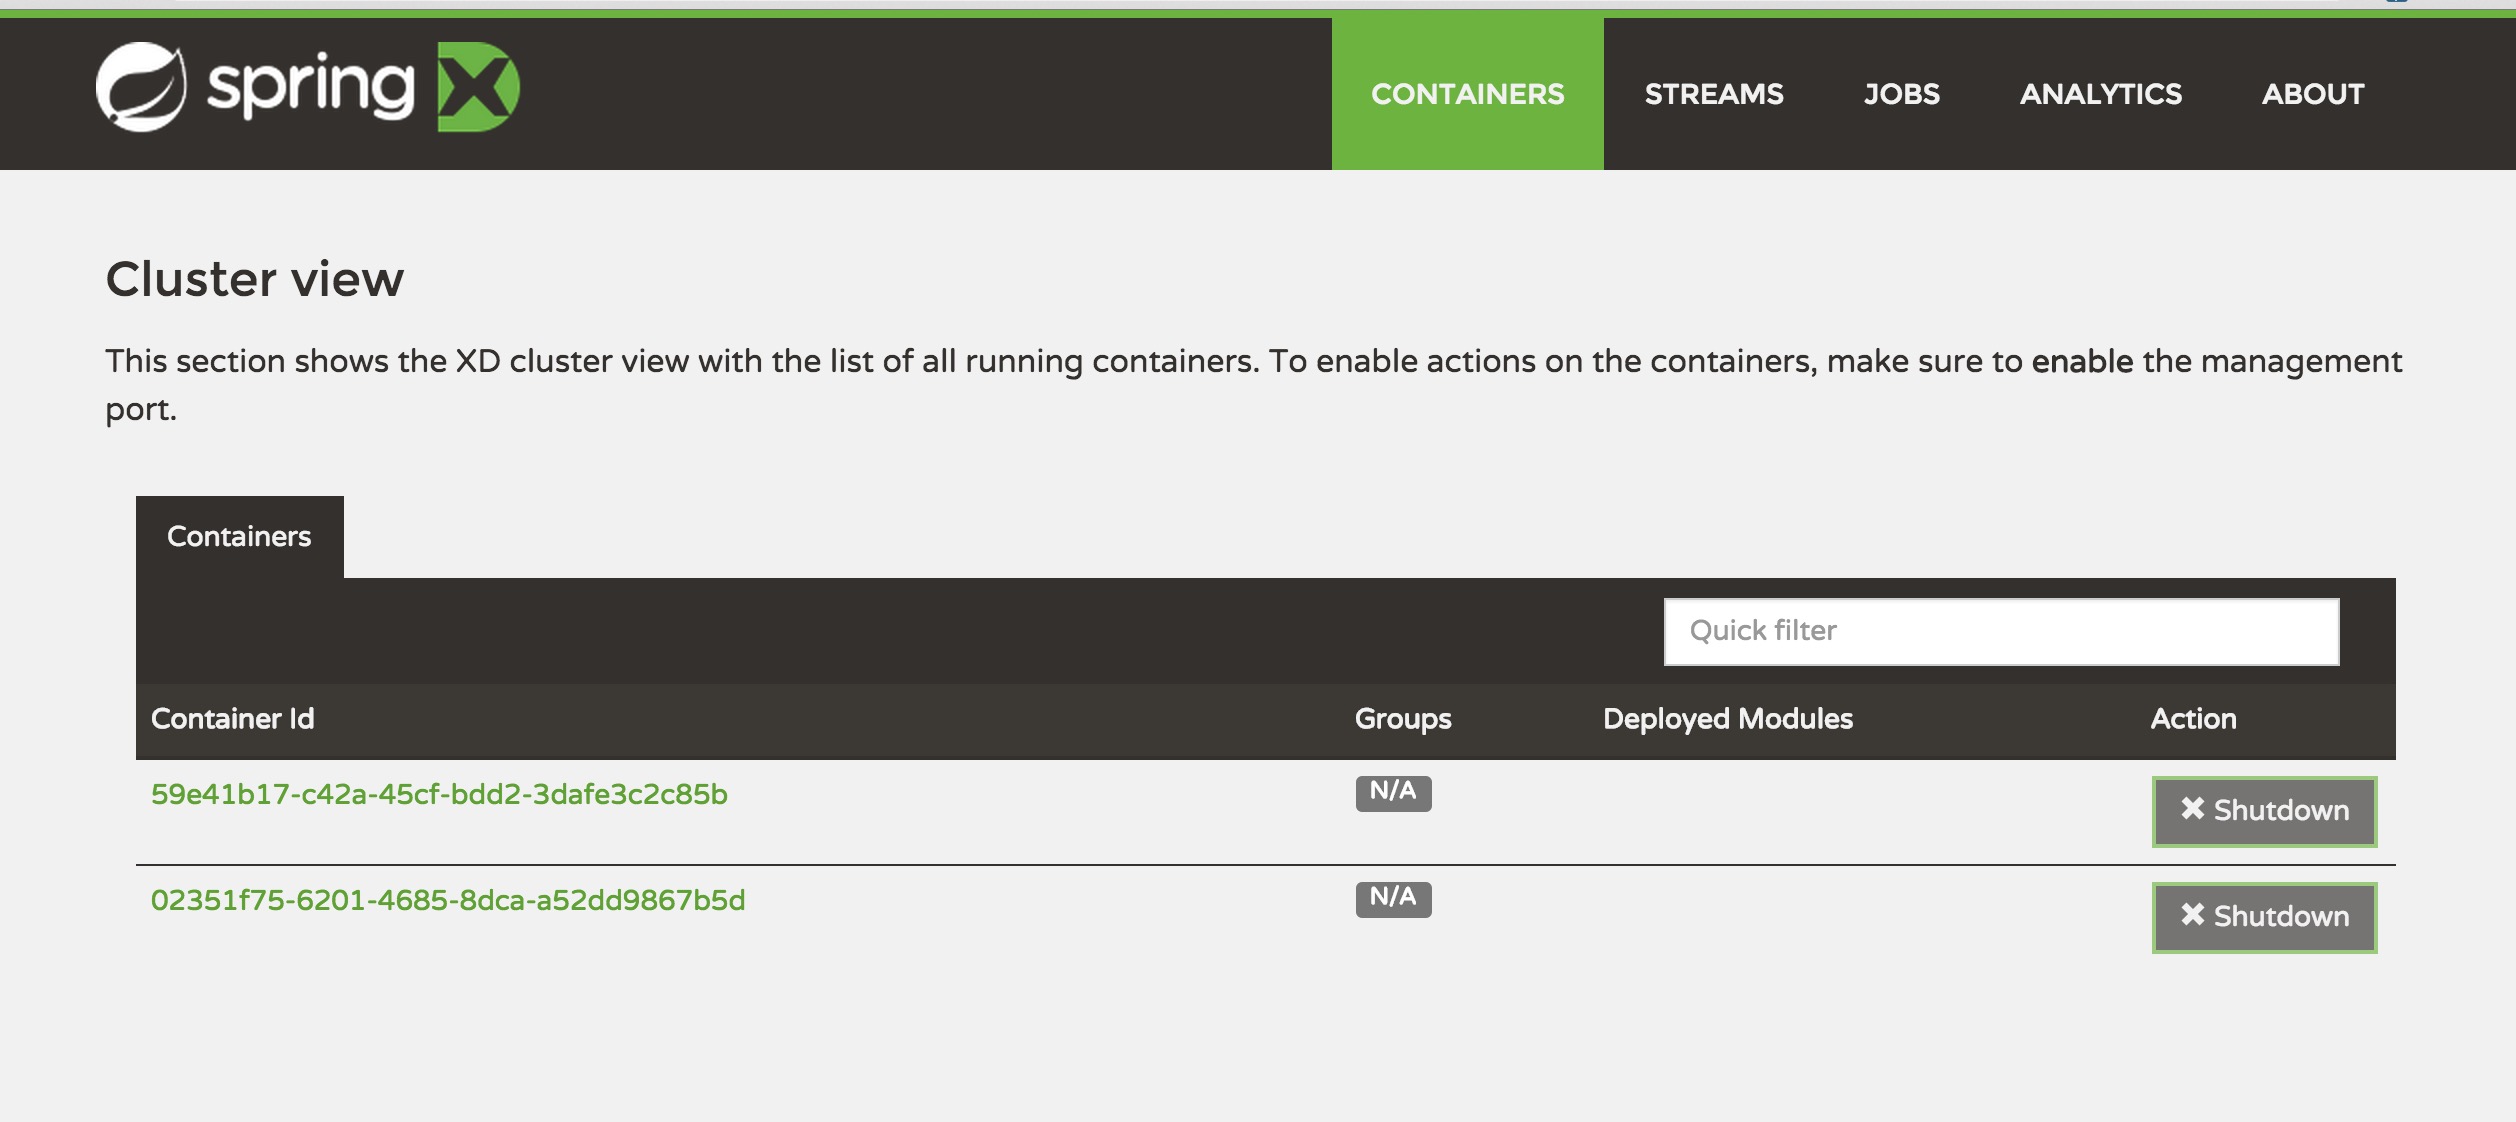
####8. 启动后可以通过web管理界面查看

可以看到container中有两台 springxd-admin-ui